Difference between revisions of "Recolouring an armour"
(Created page with "==Overview== This tutorial shows how to recolour an armour or outfit for any game that uses texture files (like Oblivion, Fallout, Skyrim or Dragon Age). == Required tools == *...") |
(No difference)
|
Latest revision as of 21:04, 10 November 2012
Overview
This tutorial shows how to recolour an armour or outfit for any game that uses texture files (like Oblivion, Fallout, Skyrim or Dragon Age).
Required tools
Recolour an armour
For a simple recolour we only need to modify the diffuse and specular maps and this is what we are going to do in this tutorial (if you are going to retexture the armour, then you'll have to edit the normal map, too, and probably the tint map).
It is also wise to save a copy of the original textures as a backup, just in case something goes wrong in the process ;)
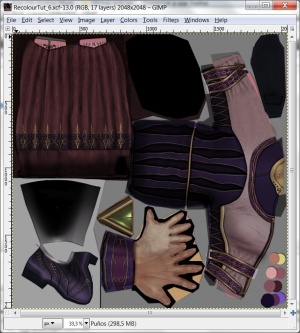
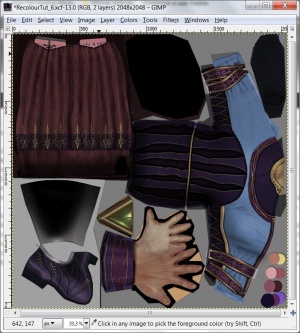
- Open the diffuse map in GIMP as shown in picture Noble outfit A diffuse map.
- Select one of the selection tools from the Toolbox (in most cases the Free Select Tool is the most useful as you will want to select an area that hasn't a geometrical shape).
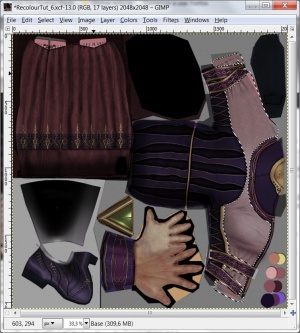
- Select the area you want to recolour. In picture Selecting an area to recolour you can see how we have selected the light pink area.
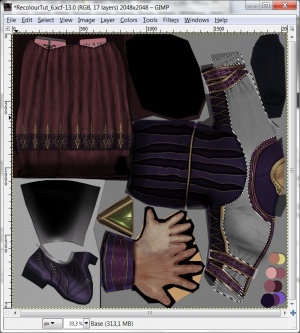
- In the layer stack, select the diffuse map you imported and select the menu option Colors -> Desaturate. Select the desaturation option you prefer and click OK. Now the selected area has lost its original colour and is painted in shades of grey as shown in picture Desaturating the selected area.
- Add a new transparent layer on top of the diffuse map:
- Select the menu option Layer -> New Layer
- Add a name for the new layer, select Transparency on the pop-up window and click OK
- Note: To see and work with the different layers that you have in your image:
- Select the menu option Windows -> Dockable Dialogs -> Layers '
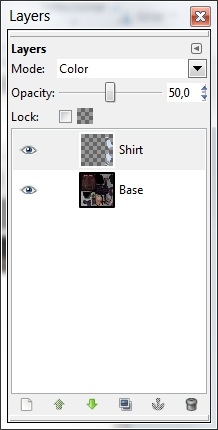
- This will open a window with the layers stack for your image as the one shown in picture Layers stack'
- To work on one of the layers, select the corresponding layer in the stak and then work in GIMP main edition window: all you do (painting, erasing, resizing, etc) will be done on the selected layer.
- To hide/show one of the layers, click on the eye icon at the left of each of the layers in the layer stack.
- Note: To see and work with the different layers that you have in your image:
- Set the foreground colour to the colour you want to use (for this tutorial I've used a light blue, the d1def1 colour).
- Select the Bucket fill tool from the toolbox and fill the selected area on the new transparent layer with the colour you've selected.
- In the layer stack select the layer that contains the colour and change the Layer mode to Color and set the Opacity to 50 as shown in picture Setting blend mode for the new layer (you can try other layer modes and opacities until you find the values that you prefer).
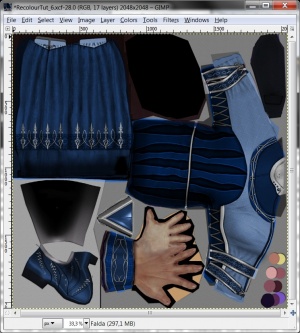
- Now you'll see that the area we've selected previously and that had a light pink colour has changed into a light blue colour as shown in picture Recolour of the selected area.
- Repeat the steps 4 to 10 (selecting an area, desaturating the diffuse map for that area, adding a new transparent layer, filling the new layer with another colour and setting its blending mode) as many times as it is required. I strongly recommend that:
- you work with different layers for the different parts of the armour you want to recolour. This way you can set the layer blending modes differently for each part of the armour.
- you don't merge the layers to the base image until the end and save a backup copy containing all the layers. This way you can always change one layer colour, blend mode or opacity easily if when texted in game you don't like the results, without affecting the rest of the work you've done.
- Once you've recoloured all the parts of the armour you wanted to recolour merge down all the layers into the base image.
- IMPORTANT: Save a backup copy of the image and all the layers you've created to recolour the diffuse map before merging them down.
- Select the layer that is just on top of the base image in the layer stack and select the menu option Layer -> Merge down.
- Repeat the merging down process for all layers, merging always the layer that is on top of the base image, until you have only one layer as shown in picture Recoloured diffuse map,
- Save the image as a dds file (that is the type of file the game recognises):
- Select the menu option File -> Save As
- Save the diffuse map in the same folder and with the same name the original diffuse map had (we are recolouring an existing armour and want to replace the existing colour with the new one).
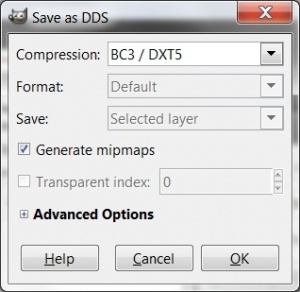
- A window will pop up asking for the parameters for saving the dds file. Check the Generate mipmaps flag and select the BC3/DXT5 compression as shown in picture Parameters for saving the DDS file.
If the armour you are recolouring has a specular map (or a glow map or a backlight map), you'll have to recolout it to. The proces is basically the same than the one followed to recolour the diffuse map. For example, to recolour the specular map, to get the armour to reflect light with the new colours we have given it, follow these steps:
- Open in GIMP the specular map of the armour.
- Open also in GIMP the backup copy of the file you've used for recolouring the diffuse map, with all the coloured layers.
- Copy the specular map into the backup copy as a new layer:
- Go to the specular map image and select the menu option Edit -> Copy.
- Then go to the backup copy and select the menu option Edit -> Paste as -> New Layer.
- On the layer stack you will see now the original specular map you've added as a new layer. Move it to the bottom of the layer stack by pressing the green down arrow.
- Delete the layer that contains the diffuse map base image (select that layer and click on the dustbin icon in the layer stack window)
- Now you will have an image that will have the specular map as the base image (the bottom layer) and all the colouring layers on top of it.
- Change all the blending modes of the colour layers to Color.
- Merge down all the colour layer to the specular image as you did before to merge them down to the diffuse map image:
- Select the layer that is just on top of the specular map image in the layer stack and select the menu option Layer -> Merge down.
- Repeat the merging down process for all layers, merging always the layer that is on top of the specular map image.
- Save the image as a dds file (that is the type of file the game recognises):
- Select the menu option File -> Save As
- Save the specular map in the same folder and with the same name the original specular map had (we are recolouring an existing armour and want to replace the existing colour with the new one).
- A window will pop up asking for the parameters for saving the dds file. Check the Generate mipmaps flag and select the BC3/DXT5 compression as shown in picture Parameters for saving the DDS file.
