Difference between revisions of "Giving sense of volume to textures using GIMP"
m (Updated link.) |
|||
| (One intermediate revision by one other user not shown) | |||
| Line 1: | Line 1: | ||
| − | ==Overview== | + | |
| + | == Overview == | ||
| + | |||
This mini guide shows how to give a sense of volume to textures using bump mapping and blending layers in GIMP. | This mini guide shows how to give a sense of volume to textures using bump mapping and blending layers in GIMP. | ||
== Required tools == | == Required tools == | ||
| − | * [ | + | |
| + | *[https://www.gimp.org GIMP] | ||
== Give sense of volume == | == Give sense of volume == | ||
| + | |||
=== Draw the basic shapes === | === Draw the basic shapes === | ||
| − | [[File:SenseOfVolumeTut 1.jpg|right | + | |
| − | [[File:SenseOfVolumeTut 2.jpg|right | + | [[File:SenseOfVolumeTut 1.jpg|thumb|right|Original texture]] [[File:SenseOfVolumeTut 2.jpg|thumb|right|Layers stack]] [[File:SenseOfVolumeTut 3.jpg|thumb|right|Original texture plus the 3 shapes]] [[File:SenseOfVolumeTut 4.jpg|thumb|right|Blend tool]] |
| − | [[File:SenseOfVolumeTut 3.jpg|right | ||
| − | [[File:SenseOfVolumeTut 4.jpg|right | ||
In this tutorial we are going to begin with a flat grey texture like the one shown in picture ''Original texture'', but you can apply the technique described here to a more complex texture with the same results. | In this tutorial we are going to begin with a flat grey texture like the one shown in picture ''Original texture'', but you can apply the technique described here to a more complex texture with the same results. | ||
We are going to add to this texture three different shapes with volume: | We are going to add to this texture three different shapes with volume: | ||
| − | # a symbol that we want to be higher than the rest of the texture | + | |
| − | # a semisphere that we want to be higher than the texture too but as a semishpere, not as a flat circle | + | #a symbol that we want to be higher than the rest of the texture |
| − | # a line that we want to be deeper than the rest of the texture | + | #a semisphere that we want to be higher than the texture too but as a semishpere, not as a flat circle |
| + | #a line that we want to be deeper than the rest of the texture | ||
First thing is to create three new transparent layers: each layer will contain one of the shapes. To add a new layer in GIMP: | First thing is to create three new transparent layers: each layer will contain one of the shapes. To add a new layer in GIMP: | ||
| − | * Select the menu option ''Layer -> New Layer'' | + | |
| − | * Add a name for the new layer, select ''Transparency'' on the pop-up window and click OK | + | *Select the menu option ''Layer -> New Layer'' |
| + | *Add a name for the new layer, select ''Transparency'' on the pop-up window and click OK | ||
To see and work with the different layers that you have in your image: | To see and work with the different layers that you have in your image: | ||
| − | * Select the menu option ''Windows -> Dockable Dialogs -> Layers '' | + | |
| − | * This will open a window with the layers stack for your image as the one shown in picture ''Layers stack'' | + | *Select the menu option ''Windows -> Dockable Dialogs -> Layers'' |
| − | To work on one of the layers, select the corresponding layer in the stak and then work in GIMP main edition window: all you do (painting, erasing, resizing, etc) will be done on the selected layer. | + | *This will open a window with the layers stack for your image as the one shown in picture ''Layers stack'' |
| − | To hide/show one of the layers, click on the eye icon at the left of each of the layers in the layer stack. | + | |
| + | To work on one of the layers, select the corresponding layer in the stak and then work in GIMP main edition window: all you do (painting, erasing, resizing, etc) will be done on the selected layer. To hide/show one of the layers, click on the eye icon at the left of each of the layers in the layer stack. | ||
Now draw one shape in one of the layers: | Now draw one shape in one of the layers: | ||
| − | # Select the first layer, draw the symbol and paint it completely in white. In this example I've used the bat symbol shown in picture ''Original texture plus the 3 shapes'' | + | |
| − | # Select the second layer to draw the semisphere: | + | #Select the first layer, draw the symbol and paint it completely in white. In this example I've used the bat symbol shown in picture ''Original texture plus the 3 shapes'' |
| − | ## First draw a circle. | + | #Select the second layer to draw the semisphere: |
| − | ### Select the menu option ''Tools -> Selection Tools -> Ellipse Select'' | + | ##First draw a circle. |
| − | ### Press the Shift key to draw a circle, then press the left mouse button and click on your image. With both keys pressed move the mouse to resize the circle. Release the left mouse button when you are done. | + | ###Select the menu option ''Tools -> Selection Tools -> Ellipse Select'' |
| − | ## As we want this shape to be a semisphere we are going to fill the circle using the Blend/Gradient tool: | + | ###Press the Shift key to draw a circle, then press the left mouse button and click on your image. With both keys pressed move the mouse to resize the circle. Release the left mouse button when you are done. |
| − | ### Select the Blend tool from the toolbox and select the ''Radial'' option for the shape of the gradient as shown in picture ''Blend tool'' | + | ##As we want this shape to be a semisphere we are going to fill the circle using the Blend/Gradient tool: |
| − | ### Press the left mouse button, click in the center of the circle and drag the mouse following one of the circle radius until reaching the border of the circle. Then release the mouse button and the circle will be automatically filled by a gradient of colours as shown in picture ''Original texture plus the 3 shapes'' | + | ###Select the Blend tool from the toolbox and select the ''Radial'' option for the shape of the gradient as shown in picture ''Blend tool'' |
| − | # Select the third layer and draw a rectangle and fill it completely in white as shown in picture ''Original texture plus the 3 shapes''. | + | ###Press the left mouse button, click in the center of the circle and drag the mouse following one of the circle radius until reaching the border of the circle. Then release the mouse button and the circle will be automatically filled by a gradient of colours as shown in picture ''Original texture plus the 3 shapes'' |
| + | #Select the third layer and draw a rectangle and fill it completely in white as shown in picture ''Original texture plus the 3 shapes''. | ||
=== Use the Bump map filter === | === Use the Bump map filter === | ||
| − | [[File:SenseOfVolumeTut 5.jpg|right | + | |
| − | [[File:SenseOfVolumeTut 6.jpg|right | + | [[File:SenseOfVolumeTut 5.jpg|thumb|right|Bump map window]] [[File:SenseOfVolumeTut 6.jpg|thumb|right|Original texture with the bump map applied]] [[File:SenseOfVolumeTut 7.jpg|thumb|right|Bump map parameters for semisphere]] [[File:SenseOfVolumeTut 8.jpg|thumb|right|Bump map parameters for deep line]] [[File:SenseOfVolumeTut 9.jpg|thumb|right|Original texture with all bump maps applied]] |
| − | [[File:SenseOfVolumeTut 7.jpg|right | ||
| − | [[File:SenseOfVolumeTut 8.jpg|right | ||
| − | [[File:SenseOfVolumeTut 9.jpg|right | ||
Now we are going to alter the original texture adding to it in relief the shapes we have previously drawn. In order to do this we are going to use the Bump map filter of GIMP. | Now we are going to alter the original texture adding to it in relief the shapes we have previously drawn. In order to do this we are going to use the Bump map filter of GIMP. | ||
| − | # Select the layer that contains the original texture | + | |
| − | # Select the menu option ''Filters -> Map -> Bump Map''. | + | #Select the layer that contains the original texture |
| − | # A window like the one shown in picture ''Bump map window'' wil pop up: | + | #Select the menu option ''Filters -> Map -> Bump Map''. |
| − | ## In the Bump map box, at the top, select the first layer where you have drawn the symbol. | + | #A window like the one shown in picture ''Bump map window'' wil pop up: |
| − | ## You can change the values of the properties, and see how if affects the original texture in the ''Preview'' window (check the Preview box to see this changes). For a shape that is not geometrical, I find that the ''Sinusoidal'' map type gives better results, but you can try the other values and see which one looks best for you. | + | ##In the Bump map box, at the top, select the first layer where you have drawn the symbol. |
| − | ## Once you've got the results you want, click OK. | + | ##You can change the values of the properties, and see how if affects the original texture in the ''Preview'' window (check the Preview box to see this changes). For a shape that is not geometrical, I find that the ''Sinusoidal'' map type gives better results, but you can try the other values and see which one looks best for you. |
| − | ## Hide all the layers except the one containing the original texture (don't delete those layers as we will use them later) and you'll see how the symbol now is painted on it in relief as shown in picture ''Original texture with the bump map applied''. | + | ##Once you've got the results you want, click OK. |
| − | # Now apply the bump map filter using the layers containing the other two drawings as patterns. | + | ##Hide all the layers except the one containing the original texture (don't delete those layers as we will use them later) and you'll see how the symbol now is painted on it in relief as shown in picture ''Original texture with the bump map applied''. |
| − | ## Semisphere: for the Bump mapping, I've used the values shown in picture ''Bump map parameters for semisphere'' | + | #Now apply the bump map filter using the layers containing the other two drawings as patterns. |
| − | ## Line: for the Bump mapping, I've used the values shown in picture ''Bump map parameters for deep line''. The important thing here is that, as we wanted the line to be deeper than the texture, we have to check the ''Invert bumpmap'' box. | + | ##Semisphere: for the Bump mapping, I've used the values shown in picture ''Bump map parameters for semisphere'' |
| + | ##Line: for the Bump mapping, I've used the values shown in picture ''Bump map parameters for deep line''. The important thing here is that, as we wanted the line to be deeper than the texture, we have to check the ''Invert bumpmap'' box. | ||
After applying all bump maps, your texture will look now something similar than the one shown in picture ''Original texture with all bump maps applied''. | After applying all bump maps, your texture will look now something similar than the one shown in picture ''Original texture with all bump maps applied''. | ||
=== Add light or darken your texture === | === Add light or darken your texture === | ||
| − | [[File:SenseOfVolumeTut 10.jpg|right | + | |
| + | [[File:SenseOfVolumeTut 10.jpg|thumb|right|Final result]] | ||
To increase the effect of relief, you can use the three layers with the drawings to add light to the higher areas and darken the deeper ones. | To increase the effect of relief, you can use the three layers with the drawings to add light to the higher areas and darken the deeper ones. | ||
Add light to higer areas: | Add light to higer areas: | ||
| − | * In the layer stack: | + | |
| − | ** Select the layer that contains the symbol and change the layer mode from ''Normal'' to ''Soft Light'', and the Opacity value from 100 to 15 (you can play with other blend modes and values to see which ones fulfill your needs). You can see the results in the main edition window. | + | *In the layer stack: |
| − | ** Select the layer that contains the semisphere and change the layer mode from ''Normal'' to ''Hard Light'', and the Opacity value from 100 to 50. | + | **Select the layer that contains the symbol and change the layer mode from ''Normal'' to ''Soft Light'', and the Opacity value from 100 to 15 (you can play with other blend modes and values to see which ones fulfill your needs). You can see the results in the main edition window. |
| + | **Select the layer that contains the semisphere and change the layer mode from ''Normal'' to ''Hard Light'', and the Opacity value from 100 to 50. | ||
Darken the lower areas: | Darken the lower areas: | ||
| − | * First thing is to change the colour of the deep line drawing from white to black: | + | |
| − | ** Select the layer that contains the line drawing in the layer stack | + | *First thing is to change the colour of the deep line drawing from white to black: |
| − | ** In the main edition window, select the menu option ''Colors -> Invert''. Now the line is black instead of white | + | **Select the layer that contains the line drawing in the layer stack |
| − | * Go back to the layer stack and change the layer mode from ''Normal'' to ''Burn'' and the Opacity value from 100 to 20 you can play with other blend modes and values to see which ones fulfill your needs). | + | **In the main edition window, select the menu option ''Colors -> Invert''. Now the line is black instead of white |
| + | *Go back to the layer stack and change the layer mode from ''Normal'' to ''Burn'' and the Opacity value from 100 to 20 you can play with other blend modes and values to see which ones fulfill your needs). | ||
The last step is to blend all layers into the original texture. To do so: | The last step is to blend all layers into the original texture. To do so: | ||
| − | * Select the layer in the stack that is just above the original layer | + | |
| − | * In the main edition window, select the menu option ''Layer -> Merge Down'' | + | *Select the layer in the stack that is just above the original layer |
| − | * Then select the layer that is now just above the original layer and merge it down. | + | *In the main edition window, select the menu option ''Layer -> Merge Down'' |
| − | * Select the last layer and merge it down. | + | *Then select the layer that is now just above the original layer and merge it down. |
| + | *Select the last layer and merge it down. | ||
If you've followed all the steps in this tutorial, now your original texture (that was only a flat grey texture) will look similar to the one shown in picture ''Final result'', where you can see that all three shapes we have drawn look as if they had volume. | If you've followed all the steps in this tutorial, now your original texture (that was only a flat grey texture) will look similar to the one shown in picture ''Final result'', where you can see that all three shapes we have drawn look as if they had volume. | ||
| − | [[Category:Texturing]] | + | [[Category:Texturing]] [[Category:GIMP]] [[Category:Tutorials]] |
| − | [[Category:GIMP]] | ||
| − | [[Category:Tutorials]] | ||
Latest revision as of 22:17, 20 November 2018
Contents
Overview
This mini guide shows how to give a sense of volume to textures using bump mapping and blending layers in GIMP.
Required tools
Give sense of volume
Draw the basic shapes
In this tutorial we are going to begin with a flat grey texture like the one shown in picture Original texture, but you can apply the technique described here to a more complex texture with the same results.
We are going to add to this texture three different shapes with volume:
- a symbol that we want to be higher than the rest of the texture
- a semisphere that we want to be higher than the texture too but as a semishpere, not as a flat circle
- a line that we want to be deeper than the rest of the texture
First thing is to create three new transparent layers: each layer will contain one of the shapes. To add a new layer in GIMP:
- Select the menu option Layer -> New Layer
- Add a name for the new layer, select Transparency on the pop-up window and click OK
To see and work with the different layers that you have in your image:
- Select the menu option Windows -> Dockable Dialogs -> Layers
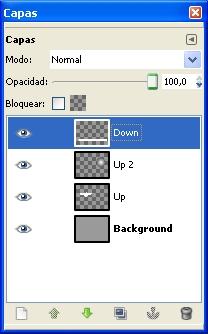
- This will open a window with the layers stack for your image as the one shown in picture Layers stack
To work on one of the layers, select the corresponding layer in the stak and then work in GIMP main edition window: all you do (painting, erasing, resizing, etc) will be done on the selected layer. To hide/show one of the layers, click on the eye icon at the left of each of the layers in the layer stack.
Now draw one shape in one of the layers:
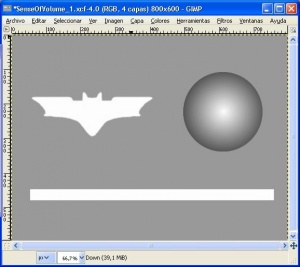
- Select the first layer, draw the symbol and paint it completely in white. In this example I've used the bat symbol shown in picture Original texture plus the 3 shapes
- Select the second layer to draw the semisphere:
- First draw a circle.
- Select the menu option Tools -> Selection Tools -> Ellipse Select
- Press the Shift key to draw a circle, then press the left mouse button and click on your image. With both keys pressed move the mouse to resize the circle. Release the left mouse button when you are done.
- As we want this shape to be a semisphere we are going to fill the circle using the Blend/Gradient tool:
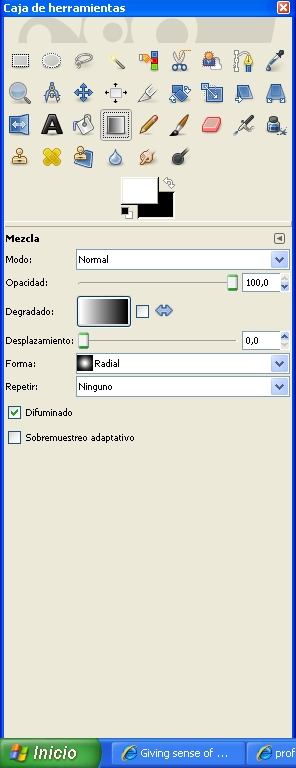
- Select the Blend tool from the toolbox and select the Radial option for the shape of the gradient as shown in picture Blend tool
- Press the left mouse button, click in the center of the circle and drag the mouse following one of the circle radius until reaching the border of the circle. Then release the mouse button and the circle will be automatically filled by a gradient of colours as shown in picture Original texture plus the 3 shapes
- First draw a circle.
- Select the third layer and draw a rectangle and fill it completely in white as shown in picture Original texture plus the 3 shapes.
Use the Bump map filter
Now we are going to alter the original texture adding to it in relief the shapes we have previously drawn. In order to do this we are going to use the Bump map filter of GIMP.
- Select the layer that contains the original texture
- Select the menu option Filters -> Map -> Bump Map.
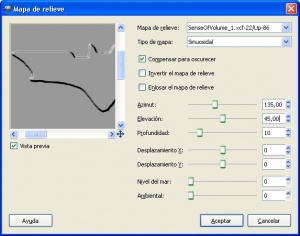
- A window like the one shown in picture Bump map window wil pop up:
- In the Bump map box, at the top, select the first layer where you have drawn the symbol.
- You can change the values of the properties, and see how if affects the original texture in the Preview window (check the Preview box to see this changes). For a shape that is not geometrical, I find that the Sinusoidal map type gives better results, but you can try the other values and see which one looks best for you.
- Once you've got the results you want, click OK.
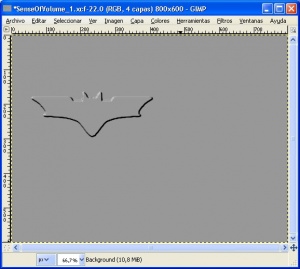
- Hide all the layers except the one containing the original texture (don't delete those layers as we will use them later) and you'll see how the symbol now is painted on it in relief as shown in picture Original texture with the bump map applied.
- Now apply the bump map filter using the layers containing the other two drawings as patterns.
- Semisphere: for the Bump mapping, I've used the values shown in picture Bump map parameters for semisphere
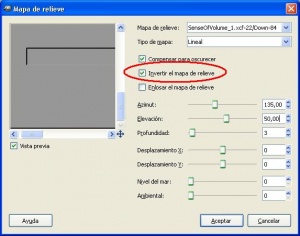
- Line: for the Bump mapping, I've used the values shown in picture Bump map parameters for deep line. The important thing here is that, as we wanted the line to be deeper than the texture, we have to check the Invert bumpmap box.
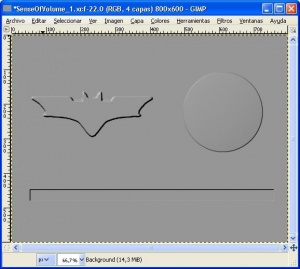
After applying all bump maps, your texture will look now something similar than the one shown in picture Original texture with all bump maps applied.
Add light or darken your texture
To increase the effect of relief, you can use the three layers with the drawings to add light to the higher areas and darken the deeper ones.
Add light to higer areas:
- In the layer stack:
- Select the layer that contains the symbol and change the layer mode from Normal to Soft Light, and the Opacity value from 100 to 15 (you can play with other blend modes and values to see which ones fulfill your needs). You can see the results in the main edition window.
- Select the layer that contains the semisphere and change the layer mode from Normal to Hard Light, and the Opacity value from 100 to 50.
Darken the lower areas:
- First thing is to change the colour of the deep line drawing from white to black:
- Select the layer that contains the line drawing in the layer stack
- In the main edition window, select the menu option Colors -> Invert. Now the line is black instead of white
- Go back to the layer stack and change the layer mode from Normal to Burn and the Opacity value from 100 to 20 you can play with other blend modes and values to see which ones fulfill your needs).
The last step is to blend all layers into the original texture. To do so:
- Select the layer in the stack that is just above the original layer
- In the main edition window, select the menu option Layer -> Merge Down
- Then select the layer that is now just above the original layer and merge it down.
- Select the last layer and merge it down.
If you've followed all the steps in this tutorial, now your original texture (that was only a flat grey texture) will look similar to the one shown in picture Final result, where you can see that all three shapes we have drawn look as if they had volume.
