Difference between revisions of "Doors Documentation"
m |
|||
| (3 intermediate revisions by the same user not shown) | |||
| Line 1: | Line 1: | ||
<div class="row"><div class="col-xs-12" id="xwikicontent"> | <div class="row"><div class="col-xs-12" id="xwikicontent"> | ||
This is about creating a proper model for AnimDoor entity. Doors are a special kind of asset that needs to be animated and reskinable. There's also a relation between door visual and it's lockpick dificulty. Final model is a .cdf file. | This is about creating a proper model for AnimDoor entity. Doors are a special kind of asset that needs to be animated and reskinable. There's also a relation between door visual and it's lockpick dificulty. Final model is a .cdf file. | ||
| + | |||
| + | |||
== <span>Door creation</span> == | == <span>Door creation</span> == | ||
| Line 6: | Line 8: | ||
To create doors you need to adhere to some rules: | To create doors you need to adhere to some rules: | ||
| − | #Pick one of the existing skeletons (in a very unlikely case you might be asked to create completely new size of doors in which case you have to | + | #Pick one of the existing skeletons (in a very unlikely case you might be asked to create completely new size of doors in which case you have to [[Skinned_Model_Documentation|create a new skeleton]] or change one of the existing ones) |
#Create a model that fits the skeleton. Make absolutely sure the handle and lock are at the position of corresponding helpers. Make sure it matches characteristics of the difficulty you're trying to create, see bellow | #Create a model that fits the skeleton. Make absolutely sure the handle and lock are at the position of corresponding helpers. Make sure it matches characteristics of the difficulty you're trying to create, see bellow | ||
#Skin/Weight the model to the bones | #Skin/Weight the model to the bones | ||
#Export .skin file | #Export .skin file | ||
| − | #Create .cdf file in a text editor | + | #Create .cdf file in a text editor |
== <span>Lockpick difficulty characteristics</span> == | == <span>Lockpick difficulty characteristics</span> == | ||
| Line 33: | Line 35: | ||
*''castle entry, castle rooms of noblesmans, Ratay townhall, monastery and church doors'' | *''castle entry, castle rooms of noblesmans, Ratay townhall, monastery and church doors'' | ||
*fancy iron hinges and studs | *fancy iron hinges and studs | ||
| + | |||
== <span>Exporting guidelines</span> == | == <span>Exporting guidelines</span> == | ||
| − | |||
| − | |||
| − | [[File:Doors documentation image2.png]] | + | [[File:Doors documentation image1.png|1000px|RTENOTITLE]] |
| + | |||
| + | [[File:Doors documentation image2.png|1000px|RTENOTITLE]] | ||
| + | |||
| + | [[File:Doors documentation image3.png|1000px|RTENOTITLE]] | ||
| − | |||
== <span>Doors in editor</span> == | == <span>Doors in editor</span> == | ||
| Line 48: | Line 52: | ||
To change door model, simply open door prefab (1), select AnimDoor (2) and switch door model for different one (3). Please keep the door orientation (left or right). Also note how the name of the door asset represents the lockpick dificulty mentioned above. However this is only a visual representation and in order to set up real lockpick difficulty, you need to change corresponding property in AnimDoor object. | To change door model, simply open door prefab (1), select AnimDoor (2) and switch door model for different one (3). Please keep the door orientation (left or right). Also note how the name of the door asset represents the lockpick dificulty mentioned above. However this is only a visual representation and in order to set up real lockpick difficulty, you need to change corresponding property in AnimDoor object. | ||
| − | [[File:Doors documentation image4.png]] | + | [[File:Doors documentation image4.png|1000px|RTENOTITLE]] |
| − | [[File:Doors documentation image5.png]] | + | [[File:Doors documentation image5.png|1000px|RTENOTITLE]] |
<div class="wikimodel-emptyline"> </div> | <div class="wikimodel-emptyline"> </div> | ||
In case you don't need door hinge/lock (for non-village doors), just select and delete w''ooden_door_a_lock'' brush from the prefab. | In case you don't need door hinge/lock (for non-village doors), just select and delete w''ooden_door_a_lock'' brush from the prefab. | ||
| − | [[File:Doors documentation image6.png]] | + | [[File:Doors documentation image6.png|1000px|RTENOTITLE]] |
| − | <div class="wikimodel-emptyline"> </div> | + | <div class="wikimodel-emptyline"> </div> |
| + | |||
== <span>How to make sure door are working ingame?</span> == | == <span>How to make sure door are working ingame?</span> == | ||
Latest revision as of 12:24, 18 February 2020
This is about creating a proper model for AnimDoor entity. Doors are a special kind of asset that needs to be animated and reskinable. There's also a relation between door visual and it's lockpick dificulty. Final model is a .cdf file.
Contents
Door creation
To create doors you need to adhere to some rules:
- Pick one of the existing skeletons (in a very unlikely case you might be asked to create completely new size of doors in which case you have to create a new skeleton or change one of the existing ones)
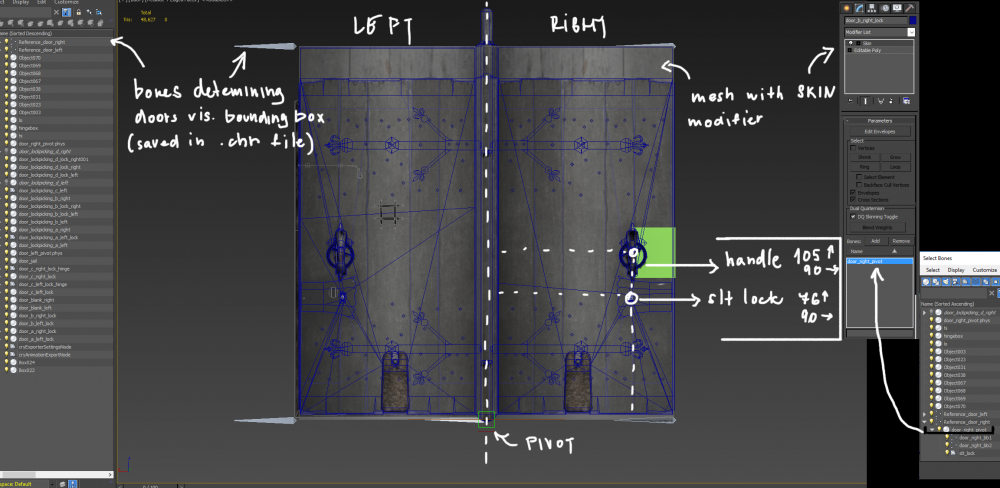
- Create a model that fits the skeleton. Make absolutely sure the handle and lock are at the position of corresponding helpers. Make sure it matches characteristics of the difficulty you're trying to create, see bellow
- Skin/Weight the model to the bones
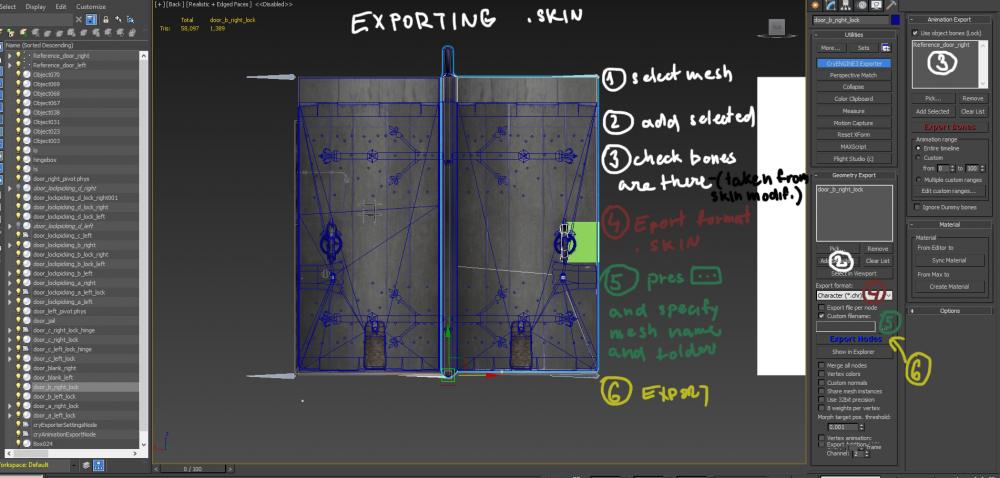
- Export .skin file
- Create .cdf file in a text editor
Lockpick difficulty characteristics
For better player's guidance, we are sorting doors by their visual that depends on locpick difficulty. Lockpick difficulty do not depends on wood color or wear of doors.
Level 1: lockpick difficulty 0–0,15
- casual village doors ( or fancy/castle doors without any metal part )
- only wood + possible metal lock
Level 2: lockpick difficulty 0,3
- village quest houses, mills, village merchants or not important houses in town
- wooden doors with metal studs + metal lock
Level 3: lockpick difficulty 0,55–0,7
- town merchants, townsman houses, armory, jail, important quest objects
- wooden doors with straight iron hinges and studs
Level 4: lockpick difficulty 0,8–1
- castle entry, castle rooms of noblesmans, Ratay townhall, monastery and church doors
- fancy iron hinges and studs
Exporting guidelines
Doors in editor
To place the door into level, you need to use door prefab: SmartObjects/Doors/AnimVillage_Left or AnimVillage_Right
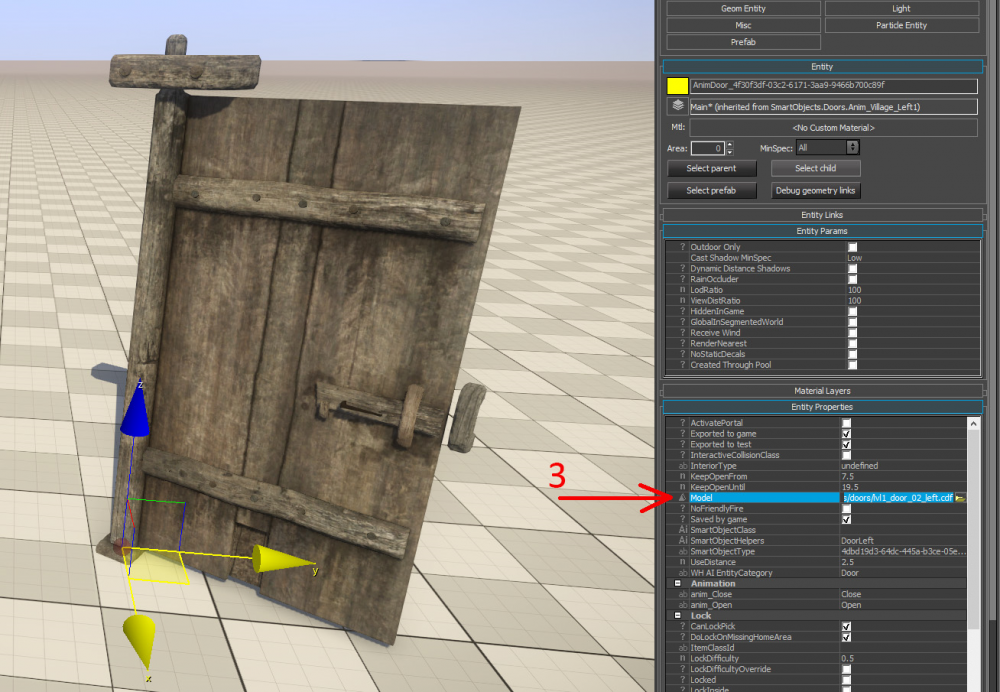
To change door model, simply open door prefab (1), select AnimDoor (2) and switch door model for different one (3). Please keep the door orientation (left or right). Also note how the name of the door asset represents the lockpick dificulty mentioned above. However this is only a visual representation and in order to set up real lockpick difficulty, you need to change corresponding property in AnimDoor object.
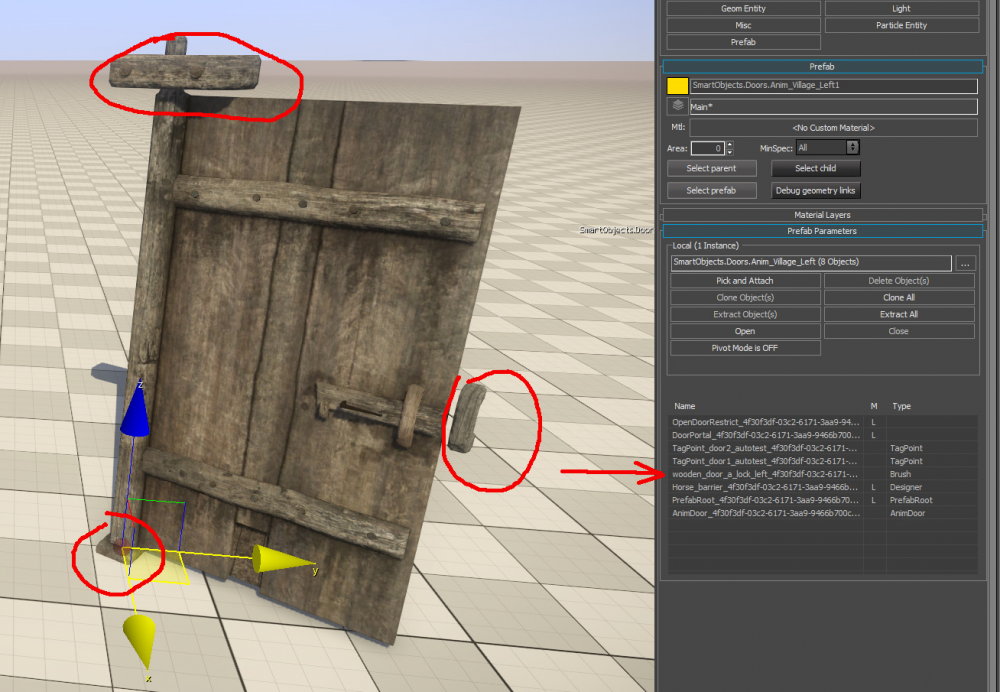
In case you don't need door hinge/lock (for non-village doors), just select and delete wooden_door_a_lock brush from the prefab.
How to make sure door are working ingame?
When navmesh is generated, it should display doublesided green arrow under the door.


