Difference between revisions of "Creating an armour for Skyrim. Part 1"
(→Creating an armour for Skyrim) |
(→= Import into Blender all parts of the _0.nif body) |
||
| Line 50: | Line 50: | ||
=== Create the _0.nif armour mesh === | === Create the _0.nif armour mesh === | ||
| − | ==== Import into Blender all parts of the _0.nif body === | + | ==== Import into Blender all parts of the _0.nif body ==== |
| + | [[File:SkyrimArmourTut_2.jpg|right|thumb|Editting the NiHeader in NifSkope]] | ||
| + | [[File:SkyrimArmourTut_3.jpg|right|thumb|Deleting the BSLightingShaderProperty]] | ||
[[File:Armour_1_Importing.jpg|right|thumb|Importing a mesh into Blender]] | [[File:Armour_1_Importing.jpg|right|thumb|Importing a mesh into Blender]] | ||
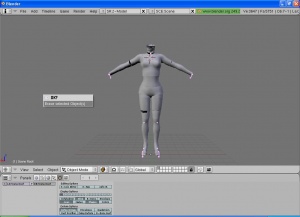
[[File:Armour_2_Delete_skeleton.jpg|right|thumb|Deleting the skeleton]] | [[File:Armour_2_Delete_skeleton.jpg|right|thumb|Deleting the skeleton]] | ||
| Line 69: | Line 71: | ||
* femalehands_0.nif: If you want to create gloves for your armour, import this mesh that contains the hands. | * femalehands_0.nif: If you want to create gloves for your armour, import this mesh that contains the hands. | ||
* femalefeet_0.nif: If you want to create gloves for your armour, import this mesh that contains the hands. | * femalefeet_0.nif: If you want to create gloves for your armour, import this mesh that contains the hands. | ||
| − | |||
| − | |||
If you want to create a helmet, a hat or earrings, you'll have to import the head meshes that are in the folder \Data\Meshes\actors\character\character assets\: | If you want to create a helmet, a hat or earrings, you'll have to import the head meshes that are in the folder \Data\Meshes\actors\character\character assets\: | ||
| Line 76: | Line 76: | ||
* femalehead.nif: head mesh for female characters | * femalehead.nif: head mesh for female characters | ||
There is only one mesh for the head as it is not affected by the weight slider. | There is only one mesh for the head as it is not affected by the weight slider. | ||
| + | |||
| + | As Blender has not yet been fully adapted to Skyrim, to be able to import the nif files into it you have to change some properties in NifSkope. Do the following: | ||
| + | # Open the body you are going to work on in NifSkope (in the example, we are using femalebody_0.nif) | ||
| + | # First step is to edit the NiHeader settings: | ||
| + | ## In the Block detais section, expand the NiHeader property as shown in picture ''Editting the NiHeader in NifSkope'' | ||
| + | ## You'll see that the ''User version'' property has a value of 12. Double click on the 12 and then change it to 11. | ||
| + | ## Then go to the ''User version 2'' property, that has a value of 83. Double click on the 83 and then change it to 34. | ||
| + | # Next step is to delete the BSLightingShaderProperty: | ||
| + | ## Expand the ''NiTriShape'' node as shown in picture ''Deleting the BSLightingShaderProperty'' | ||
| + | ## Select the ''BSLightingShaderProperty'' node and press Ctrl+Del or right click and select the menu option ''Block -> Remove Branch'' | ||
| + | ## Do this for all the NiTriShape nodes the mesh has (if it has more than one) | ||
| + | # Save the modified nif file. This modified nif is the one you will be importing into Blender. | ||
| + | |||
| + | :'''''Note:''' To import a nif file into Blender use the menu option ''File -> Import -> Netimmerse/Gamebyro (.nif)''. If you cannot find that option it is because you haven't installed NifScripts. Follow the instructions given here: [[Installation_of_Blender|Installation of Blender]] to install everything you need.'' | ||
Once you have all the body parts imported into Blender, delete all the skeletons you've imported with them. To do this, select each skeleton (Scene Root) as shown in picture ''Deleting the skeleton'', press the ''Delete'' key and select OK. You have to repeat this process until you have deleted all the skeletons you've imported into Blender. Take into account that each part of the body you import will bring its own part of the skeleton. | Once you have all the body parts imported into Blender, delete all the skeletons you've imported with them. To do this, select each skeleton (Scene Root) as shown in picture ''Deleting the skeleton'', press the ''Delete'' key and select OK. You have to repeat this process until you have deleted all the skeletons you've imported into Blender. Take into account that each part of the body you import will bring its own part of the skeleton. | ||
Revision as of 12:32, 14 January 2012
Contents
Overview
This tutorial shows all the main steps you need to follow to create an armour or an outfit from scratch for Skyrim. If you only want to change the textures of an existing piece of clothing or change its properties and bonus, just skip the first part of the tutorial. If you want to adapt existing armours or outfits to other bodies you will have to follow the steps explained here, except that you won't have to create the mesh (but you may probably have to adapt it to the new body), the textures or the UV maps.
As currenly the tools used for modelling are not completely adapted for Skyrim, there are some steps that require some manual adjustments. This will surely change in the future months and this tutorial will be updated when required. Also, as the CK has not yet been released that part of the tutorial now will only explain how to replace existing armours/clothes. Once the CK is available, the tutorial will also be updated.
Required tools
Creating an armour for Skyrim
The main steps to create a custom armour or outfit for Skyrim are:
- Creating the armour:
- Create the _0.nif armour mesh:
- Import into Blender all parts of the _0.nif body
- Make the armour's shape
- Add a material
- Add a UVmap
- Create the textures and the normal maps in GIMP
- Reduce the amount of polygons of the mesh
- Add weights to the armour
- Cut parts of the body hidden by the armour
- Export the armour
- Adjust the armor in Nifskope
- Add the armour to the game
- Adjust the armour after testing it in game
- Create the _1.nif armour mesh:
- Import into Blender all parts of the _1.nif body
- Adjust the _0.nif armour shape
- Export the armour
- Adjust the armor in Nifskope
- Add the armour to the game
- Adjust the armour after testing it in game
- Create the _0.nif armour mesh:
Skyrim armour/clothing meshes
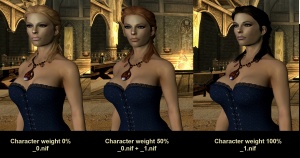
Skyrim has introduced a new feature for characters: the weight slider. You can set the weight of characters or NPCs from 0% (the weight slider is completely to the left) to 100% (the slider is completely to the right). The changes in the shape of the character are managed using 2 mesh files for each armour/piece of clothing (this also applies to the meshes that contain parts of the body):
- Whith 0% weight, the game uses the _0.nif
- With 100% weight, the game uses the _1.nif
- With any intermediate weight, the game combines the _0.nif and the _1.nif
An example of this is shown in picture Skyrim armour/clothing meshes and character weight.
This means that you will have to create two meshes for each of the armours/pieces of cloth instead of only one. In this tutorial we are going to create first the _0.nif armour and once it is finished we will adapt it to the _1.nif body
Create the _0.nif armour mesh
Import into Blender all parts of the _0.nif body
When creating an outfit or an armour first thing is to decide what body you want to make the clothes for. If you want to create an armour that fits several bodies (male and female, for example) you will have to create different armours for each body.
That is why the first step is to import into Blender all the parts of the body you want to work with. The nif files that contain the body meshes are in the folder \Data\Meshes\actors\character\character assets\.
- Note: The meshes and textures of the game are inside compressesd files with BSA format. To extract then you can use SripterRon's FO3 Archive Utility.
If you are going to create the armour for a male, you'll have to import the following body parts:
- malebody_0.nif: In Skyrim this nif file contains the torso, arms and legs.
- malehands_0.nif: If you want to create gloves for your armour, import this mesh that contains the hands.
- malefeet_0.nif: If you want to create gloves for your armour, import this mesh that contains the hands.
If you are going to create the armour for a female, you'll have to import the following body parts:
- femalebody_0.nif: In Skyrim this nif file contains the torso, arms and legs.
- femalehands_0.nif: If you want to create gloves for your armour, import this mesh that contains the hands.
- femalefeet_0.nif: If you want to create gloves for your armour, import this mesh that contains the hands.
If you want to create a helmet, a hat or earrings, you'll have to import the head meshes that are in the folder \Data\Meshes\actors\character\character assets\:
- malehead.nif: head mesh for male characters
- femalehead.nif: head mesh for female characters
There is only one mesh for the head as it is not affected by the weight slider.
As Blender has not yet been fully adapted to Skyrim, to be able to import the nif files into it you have to change some properties in NifSkope. Do the following:
- Open the body you are going to work on in NifSkope (in the example, we are using femalebody_0.nif)
- First step is to edit the NiHeader settings:
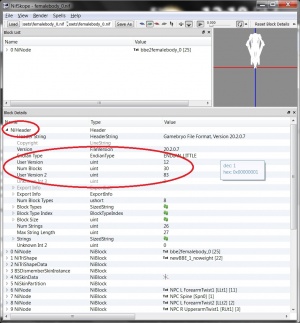
- In the Block detais section, expand the NiHeader property as shown in picture Editting the NiHeader in NifSkope
- You'll see that the User version property has a value of 12. Double click on the 12 and then change it to 11.
- Then go to the User version 2 property, that has a value of 83. Double click on the 83 and then change it to 34.
- Next step is to delete the BSLightingShaderProperty:
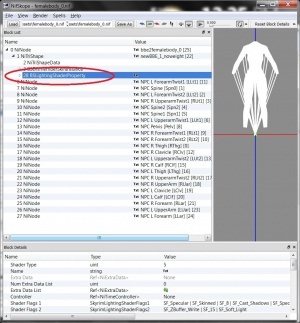
- Expand the NiTriShape node as shown in picture Deleting the BSLightingShaderProperty
- Select the BSLightingShaderProperty node and press Ctrl+Del or right click and select the menu option Block -> Remove Branch
- Do this for all the NiTriShape nodes the mesh has (if it has more than one)
- Save the modified nif file. This modified nif is the one you will be importing into Blender.
- Note: To import a nif file into Blender use the menu option File -> Import -> Netimmerse/Gamebyro (.nif). If you cannot find that option it is because you haven't installed NifScripts. Follow the instructions given here: Installation of Blender to install everything you need.
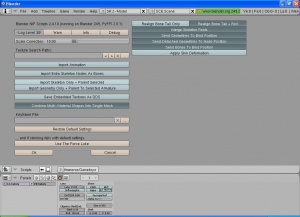
Once you have all the body parts imported into Blender, delete all the skeletons you've imported with them. To do this, select each skeleton (Scene Root) as shown in picture Deleting the skeleton, press the Delete key and select OK. You have to repeat this process until you have deleted all the skeletons you've imported into Blender. Take into account that each part of the body you import will bring its own part of the skeleton.
Once you have just the body meshes, without the skeletons, it is worth you save it in a blend file you can reuse in the future (if you think you are going to create more armours or outfits). This will save you repeating this importing process each time.
