Difference between revisions of "Assets Documentation"
m |
m |
||
| Line 194: | Line 194: | ||
In editor's Material editor, it's recommended to fill in "tif" instead of "dds". However what you see in the viewport are compiled DDSs. | In editor's Material editor, it's recommended to fill in "tif" instead of "dds". However what you see in the viewport are compiled DDSs. | ||
| + | |||
| Line 202: | Line 203: | ||
Complex models use multimaterial - i.e. several material IDs under the one joint name. | Complex models use multimaterial - i.e. several material IDs under the one joint name. | ||
| − | Whenever possible and your materials meant to be visible from close up should make use of | + | Whenever possible and your materials meant to be visible from close up should make use of [[Detail_Atlas_Documentation|detail atlas.]]. |
More reference regarding the materials could be find in the Cry Engine Documentation: | More reference regarding the materials could be find in the Cry Engine Documentation: | ||
Revision as of 11:37, 17 February 2020
Contents
General
This talks about assets in sense of models created for level not about all the different pieces of data.
Asset creation for games is no easy task. Of course you need to be able to use many intricate applications and have a feel for what's nice, but that's not the only thing. Because in case of realtime rendering resources are limited, you have to be able to ballance many aspects of the asset for it to be usable and nice to look at. Furthermore an asset is not an island and that makes judging what you can and cannot afford even harder. Basicaly, you are always trying to create as nice an asset as you can in the limits of technical constraints. And the knowledge of where you can push further and when you can hold back without compromising quality is a hallmark of a good game artist.
Every asset needs couple of things:
- model - geometry of the asset
- material - defines what shaders and textures are used
- mapping - defines what pixels of textures are used on what pixels of a rendered asset. In some cases it may define something completely different (e.g. uberlods use it to define final size)
- textures - defines many different things like color, normal direction, high frequency height differences or even where will rust appear first when a weapon gets older.
- Physics proxy - reduces physical simulation cost of an asset by approximating its geometry
- surface type - defines what a physics reaction will look like, sound like and some other things
- shadow proxy- reduces shadowcasting cost of an asset
- LODs- reduces rendering costs of an asset from distance
Model
Tricount
To see why tricount is a better measurement than polycount click here.
During modelling you need to pay attention to tricount. Less is better for GPU and memory, but visual quality shouldn't suffer much. You should always try to save triangles on flat surfaces so you can use them on silhouettes. On flat surfaces normal map can be enough and if you combine it with OBM/POM there shouldn't be any difference to detail model.
Hero assets in general can have more triangles than regular one.
Vegetation assets that will be placed in groups or used in fillers should use less.
Think about prevailing view distance of the model in game. Roof that the player won't ever be able to get close to doesn't need a lot of details, but a torch he will hold in hand does.
Round things will allways need more triangles where the silhouette is round, but that doesn't have to apply for the whole thing. For example a log needs to have a lot of geo on both ends, but the middle can be quite lowpolly.
It is hard to give some general "good triangle amount" for every model, but the technical limit in cryengine is 64 000 indices (split vertices). A suggestion to start with would be:
- 0.1m3 = 500 tris
- 1m3 = 1000 tris
- 10m3 = 20000 tris
- 100m3 = couple of 64 000 tris models.
But as stated above that doesn't mean that a big cube needs to be tesselated heavily, nor that an intricate family sword that the player have usually in hand needs to be a low poly blob.
Reusing
Games in general are about repeating. Even art benefits from reusing assets and parts of assets so it's a good idea to think about it from the begining. In terms of model it saves time spent on modeling and mapping. In terms of memory you might enable an option to reuse textures. Sometimes to create a model you need to make just a few uniqe parts and then build with them like with lego blocks. Even adding triangles to enable the possibility of repeating texture elements is usually a good thing. Allways try to think about ways how to make this. Don't worry too much about loosing uniqueness. It can be than added by local deformations, decals, second UV textures or vertex color.
Pivot
There are some reasons to think about pivot placement as well.
First of all since the resulting file needs to be as small as possible some compression will happen. As a result, vertices you carefully position in max might end up a somewhere else in editor. This imprecission is bigger the further the vertex is from the pivot and in 100 meters it might make couple of cm easily.
Second thing is the ease of use. In editor you can align a model to any surface by hoding Ctrl+Shift+click. Think about how the model will be usually positioned and place the pivot so it can be aligned easily. This is less of an issue for unique assets like castles, because these are placed once and are big so the precission is needed more.
Dimensions
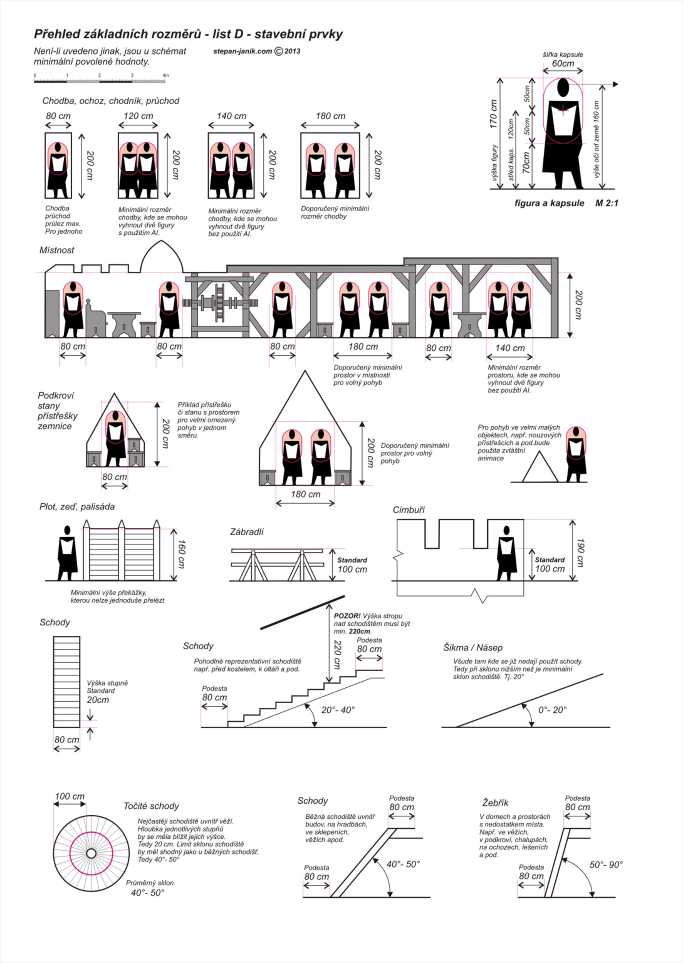
Some things in the game need to be made using standardized dimensions - for example height of chair, widht and height of the door frame, height of building floor etc. You can see dimensions here.
Mapping
Good mapping can save a lot of memory and a lot of work as well. It is where most of the reusing can happen and where final texture resolutions are decided.
Percentage of UV space used
Leave as little unused UV space as possible.
Automatic packing algorithms are great, but are working well only with rectangle like islands. Also they might mess up direction of your islands (e.g. you might want to map wood according to the grain in texture). And lastly it maps things uniquely and that is not what you want.
Straightening islands that won't get distorted by it much is a good idea, because it will likely save quite some space.
Reusing UV space
Every island that shares space with another is a free resolution in a way.
Flat things might be mapped the same from both sides.
Sectors of round things might share the space. Both halves of a barrel for example can use the same UV space. Even quarters might work well.
Tiling saves loads of space. The detail can be added by decals, second UV textures (obsolete) or vertex color.
Textures
Texel ratio
Most important thing for percieved resolution is texel ratio. Our target texel ratio is 256px for diffuse maps on PC, which means that on a 1m2 you'll have 2562 pixels. Ideally this should be the case for every surface in the game but as with everything, there are exceptions and technical limitations that prevents it.
A hero assets might need more texel ratio as they will be close to the camera quite often. On the other hand we don't need as much on bottom of a table desk because that won't be visible almost ever.
Flattening the geometry during mapping will likely result in some distortion and that will cause different texel ratios on different triangles.
Texel ratio of 256 is only important for LOD0. Textures you won't see from closeup can be and should be of lower density.
Maps other than diffuse have these texel ratios:
- Normal+Gloss - 256 (128 in case it's possible)
- Specular - 64
- Heightmap - 64
- DetailAtlas - 32
- Detail - 1024 (is achieved by tiling)
Texel ratio can be view in editor using r_TexelsPerMeter = 256 or clicking the right button on Viewmodes panel.
![]()
This overides shaders with texel ratio debug shader. You can tell by the color how far off the specified value a model is by color.
- Red is at least twice as much as the value (>512 in our case)
- White/green/black is on the spot.
- Dark blue is 0. This is the tricky part, because while the rightmost end of the legend shows twice the texel ratio, the leftmost shows 0, not half the texel ratio. This means that half is actually in the middle of the left side of the legend.
For more information refer to this page.
Resolution
Resolution depends on the texel ratio and mapping. For example if I create a 1x1x1 box in max and leave the default mapping where all the sides are mapped on top of each other filling the 0,0 to 1,1 UV space then for a diffuse texture I will use 256x256 pixels.
Detail maps
Detail maps are extremely important because texel ratio of 256 isn't sharp enough from close up. We have a technology called detail atlas, that allows us to use multiple detail maps on single model, so almost everything can make use of them. All detail textures have resolution of 256x256. It is important to set proper tiling based on diffuse map. Target texel ratio for detail maps is 1024.
Example of tiling settings:
- Diffuse 256x256 - Detail tiling 4,4
- Diffuse 1024x1024 - Detail tiling 16,16
- Diffuse 512x1024 - Detail tiling 8,16
Be aware that detail map can be mapped from 1st uv channel or the second. Second mapping channel is a default if there is one. You can switch to 1st using a flag in shader generation params called Use 1st UVs for DetailMap.
Reusing
Whenever you can, you should use a texture that already exists in the level. Not only will it save time, it also saves the memory and streaming bandwidth. When a same texture is used on two models being rendered together it is loaded only once into the memory.
Detail frequency
Detail frequency in an image means how frequently a significant change of values occur in an image. For example a picture of a white noise has a very high frequency of details, while a simple gradient has a very low frequency of detail. Usually a picture will have multiple different frequencies in smaller or larger amounts. A rich and eye-pleasing texture usually has a all the frequencies well represented so it is a good thing too keep in mind.
Rich low frequency details might result in a texture that will show any tiling a lot. This is why a detail maps, which tile a lot, should have only the details of higher frequencies present.
Exporting textures from Photoshop
At first, you'll need a plugin to be able to save CryTiff file format from Photoshop. How to install CryTiff plugin.
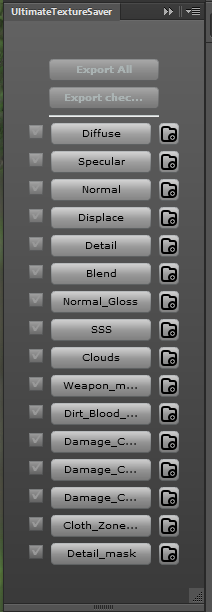
To make artist's life easier, we have our inhouse Photoshop tool called Ultimate Texture saver that creates the basic layer structure and helps you save the textures you need. You can find it in WH\Tools\Photoshop, instalation via Adobe Extension Manager. However this tool doesn't wotk in later Photoshop version (CC version 14 is probably the latest working)
We can have all the related textures in one joint PSD file (diffuse, specular, normal, height...), sorted into specificaly named groups. Ultimate Texture Saver then combines the groups together in order to create texture and saves it to CryTiff automaticaly. The groups can be created manualy or by clicking the button to the right of texture type. Lets say you need diffuse texture with alpha:
- click on the button to the right of Diffuse button
- this will create groups "diff" and "alpha" within active psd file
- fill the groups with content
- save psd file with proper name
- click on Diffuse button, this will arrange the texture (put content of the "diff" group in RGB channels, content of the "alpha" group into alpha channel) and open Crytiff dialog (see bellow). It will also add proper texture suffix "_diff", again see bellow.
- if your asset needs to have normal map as well, just click next to Normal and it will create layer named "normal" etc.
Compression
One of the most precious resources in realtime rendering is memory. This is why texture compression is an important and higly optimized feature of game engine asset preparation tools. The fact that it is highly optimized means you need to know what you are doing to make a good use of it.
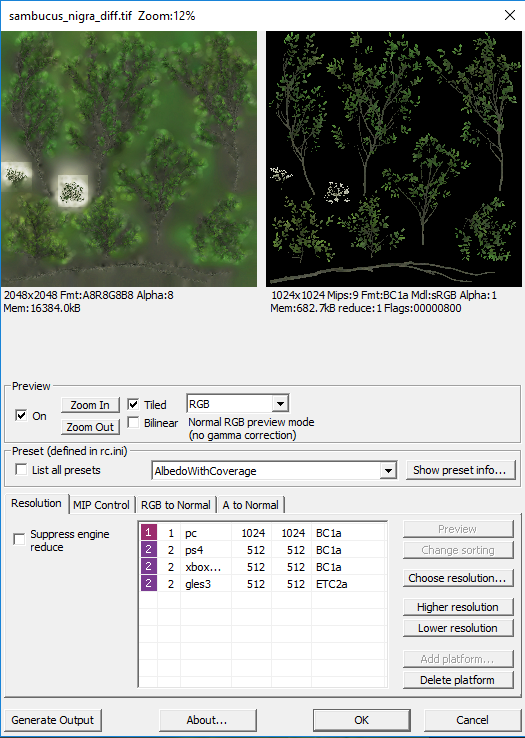
In case of CryENGINE, compression happens in Resource Complier (RC). Right after Photoshop saves Crytiff file, it calls RC and passes the image to it.
Important things to set up here are the preset and proper reductions. By default a sensible preset should be picked automatically (based on texture suffix), but for example in case of diffuse with alpha, you have to specify whether you want Albedo with coverage or with opacity. Coverage will reduce the quality of diffuse slightly, but saves the alpha with no extra memory requirements. Opacity saves full fledged alpha map in the alpha channel so the resulting map will be bigger.
Reduces are set according to your working Photoshop resolution and wanted final texture resolution. You should know what size you want on PC to keep texel ratio of 256 and for other platforms it is half of that.
Basic types of textures
When saving textures in Photoshop, Ultimate Texture Saver does the most work for you. However in case you don't have it, you need to prepare texture before saving by yourself, i.e. to fill appropriate channels with appropriate content, use proper filename suffix and select proper RC profile. For basic file types, see following:
Diffuse map: albedo in R, G, B channels, alpha in Alpha channel, filename suffix "_diff", RC preset "AlbedoXXX"
Normal map: normals in R, G, B channels, filename suffix "_ddn", RC preset "Normals"
Normal map combined with glossiness: normals in R, G, B channels, glossiness in Alpha channel, filename suffix "_ddna", RC preset "NormalsWithSmoothness"
Specular map: specular in R, G, B channels, filename suffix "_spec", RC preset "Reflectance"
Height map: black in R, G, B channels, height map in Alpha channel, filename suffix "_displ", RC preset "Displacement"
Detail mask: values same in R, G, B and A channels, filename suffix "_dtmask", RC preset "Detailmask"
More info about CryTiff: https://docs.cryengine.com/display/SDKDOC2/CryTIF+Plugin
More info about texture types: https://docs.cryengine.com/display/SDKDOC2/Textures+Types
DDS and working with textures in the editor
As soon as the Crytiff is saved, RC compiler (running on the background when the editor is started) converts it into DDS file based on the settings from the dialog above (resolution reduction, RC preset etc.). It's NOT recommended to save DDS directly from Photoshop, you'd loose some options.
In editor's Material editor, it's recommended to fill in "tif" instead of "dds". However what you see in the viewport are compiled DDSs.
Materials
Material defines the shader and textures used while rendering an asset. You should always use as simple shader as possible.
Complex models use multimaterial - i.e. several material IDs under the one joint name.
Whenever possible and your materials meant to be visible from close up should make use of detail atlas..
More reference regarding the materials could be find in the Cry Engine Documentation:
General assset creation:
https://docs.cryengine.com/display/CEMANUAL/Basic+Asset+Setup+and+Export+-+3ds+Max
http://docs.cryengine.com/display/SD...or+and+Shaders
http://docs.cryengine.com/display/SD...+Based+Shading
Asset types sorted by purpose
Brushes
Everything player/NPC cannot interact with 
Props
Prop is a simpliest type of brush that doesn't need to follow any special rules apart those that are common for all brushes. It is saved as CGF file. Most of the assets are props. Sacks, boxes, fences, stones, piles of logs... everything that isn't space defining by itself. Also most of the other object types are just like props with something more to them or they differ in details.
- stone
- fence
- pile of logs
- roadside
- ...
Structures
Structure is a type of brush that in some way defines the space in world. It has rooms, corridors, doorways and so on. They should follow certain rules, for example dimension rules.
- castle
- house
- bridge
- tunnel
- ...
It is important to create thing with these in mind for two major reasons:
- For animations to align properly
- For navmesh to generate properly
Interactive objects
Objects player or NPC can interact with.
Pickable items
Small objects player/NPC can pick up
- Axe
- Sword
- Bread
- ...
Furniture
Anything player or NPC can sit on, lay on or in general align to during some animation. Need to follow standardized dimension.
- Chair
- Bed
- ...
Stashes
Lootable container with inventory. Should be easily distinguished from other non-lootable assets/containers.
Lockable
has a lock
- chest
- cabinet
- ...
Regular
has no lock
- shelve
- sack
- ...
Doors
basicaly Lockable Furniture.
Ladders
ladder prefab, allows player to scale it.
Special cases
Uberlods
Proxies
- Physics proxies
- Occlusion proxies
There are some things that all the assets have in common and some that are unique to specific category. Prop is the most basic type of asset and other assets have just something more to them or differ in details.

