Difference between revisions of "WH Flow Graph Documentation"
m |
|||
| (9 intermediate revisions by one other user not shown) | |||
| Line 1: | Line 1: | ||
| − | Quest Flow Graph | + | |
| + | |||
| + | = Quest Flow Graph = | ||
This page documents the Quest Flow Graph extension to the standard CryEngine Flow Graph. | This page documents the Quest Flow Graph extension to the standard CryEngine Flow Graph. | ||
| − | Consult CE documentation if you wish to learn more about standard Flow Graph. | + | Consult [https://docs.cryengine.com/display/SDKDOC2/Home|CE CE documentation] if you wish to learn more about standard Flow Graph. |
| − | Since Quest Flow Graph operates atop the Quest System, most of the documentation of this tool is in Quest System documentation. This page covers only basic controls and elements of this tool. | + | Since Quest Flow Graph operates atop the Quest System, most of the documentation of this tool is in [[Quest_System_Documentation|Quest System documentation]]. This page covers only basic controls and elements of this tool. |
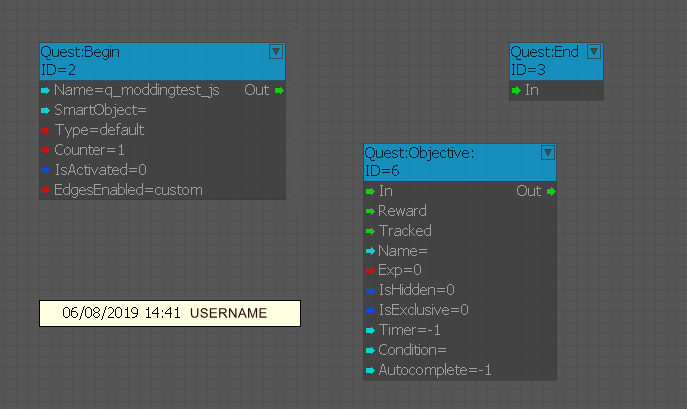
Flow Graphs consist of a set of nodes and edges. Nodes define states and some implicit logic, or provide additional values from other systems (e.g. references to assets from the game level). Edges define relationship between nodes and the rest of the logic. | Flow Graphs consist of a set of nodes and edges. Nodes define states and some implicit logic, or provide additional values from other systems (e.g. references to assets from the game level). Edges define relationship between nodes and the rest of the logic. | ||
| − | [[File:Quest System Documentation Image1.png|623x266px]] | + | [[File:Quest System Documentation Image1.png|623x266px|Quest System Documentation Image1.png]] |
= New Quest Flow Graph = | = New Quest Flow Graph = | ||
| − | The first step is to create a new quest smart object in Swift. Follow the naming conventions. Copy or remember that name (hereinafter ''questName''). | + | The first step is to create a new quest smart object in [[KCD_Swift_Documentation|Swift]]. Follow the naming conventions. Copy or remember that name (hereinafter ''questName''). |
Click this option | Click this option | ||
| − | [[File: | + | |
| + | [[File:FlowGraph_Documentation_Image2.png]] | ||
You will be prompted to save a XML file. Name it ''questName.xml''.<br/> It should be stored under ..\Data\Libs\quests\flowgraphs | You will be prompted to save a XML file. Name it ''questName.xml''.<br/> It should be stored under ..\Data\Libs\quests\flowgraphs | ||
| Line 24: | Line 27: | ||
An empty Quest FG will be created | An empty Quest FG will be created | ||
| − | [[File: | + | [[File:FlowGraph_Documentation_Image3.png]] |
The comment that now states “Not in DB” indicates when was the FG last committed to DB. | The comment that now states “Not in DB” indicates when was the FG last committed to DB. | ||
| Line 30: | Line 33: | ||
The FG can now be found under XML folder. | The FG can now be found under XML folder. | ||
| − | [[File: | + | [[File:FlowGraph_Documentation_Image4.png]] |
== Move FG to non-default folder == | == Move FG to non-default folder == | ||
| − | This folder view is exclusively meant to store XML backups. However your Quest FG must be stored in DB so you should move the newly created reference to another sister folder. You can choose any folder you wish or create a new one. Creating a new | + | This folder view is exclusively meant to store XML backups. However your Quest FG must be stored in DB so you should move the newly created reference to another sister folder. You can choose any folder you wish or create a new one. Creating a new folder named after your mod is a good idea. |
You move the file this way: | You move the file this way: | ||
| − | [[File: | + | [[File:FlowGraph_Documentation_Image5.png]] |
| − | [[File: | + | [[File:FlowGraph_Documentation_Image6.png]] |
Result: | Result: | ||
| − | [[File: | + | [[File:FlowGraph_Documentation_Image7.png]] |
As a result our new quest is now under new folder but it is still not stored in DB. | As a result our new quest is now under new folder but it is still not stored in DB. | ||
| Line 54: | Line 57: | ||
Fire up the quicksearch utility by pressing Q anywhere in the Graph space, and type in objective. | Fire up the quicksearch utility by pressing Q anywhere in the Graph space, and type in objective. | ||
| − | [[File: | + | |
| + | [[File:FlowGraph_Documentation_Image8.png]] | ||
Confirm with Enter. A node of the type Objective is inserted. | Confirm with Enter. A node of the type Objective is inserted. | ||
| − | [[File: | + | [[File:FlowGraph_Documentation_Image9.png]] |
Now the quest is valid and you can press the “Export Button”. | Now the quest is valid and you can press the “Export Button”. | ||
| − | [[File: | + | [[File:FlowGraph_Documentation_Image10.png]] |
A confirmation window will pop-up after a while and the comment will signalize the time of last commit and username of the last committer. | A confirmation window will pop-up after a while and the comment will signalize the time of last commit and username of the last committer. | ||
| − | [[File: | + | [[File:FlowGraph_Documentation_Image11.png]] |
| − | Every time you make a change you do it locally. Only after Exporting the quest is the Quest FG stored in DB. | + | Every time you make a change you do it locally. Only after Exporting the quest is the Quest FG stored in DB. |
| + | |||
| + | ==Errors== | ||
Should your export to DB fail, you will find error messages in the console.<br/> Common errors: | Should your export to DB fail, you will find error messages in the console.<br/> Common errors: | ||
| Line 77: | Line 83: | ||
*Exclusive properties set at once (e.g. item category vs item type) | *Exclusive properties set at once (e.g. item category vs item type) | ||
*Clashing IDs | *Clashing IDs | ||
| + | |||
| + | |||
| + | |||
= Nodes = | = Nodes = | ||
| Line 90: | Line 99: | ||
All other nodes belong to 2 groups | All other nodes belong to 2 groups | ||
| − | + | '''Asset tracking''' | |
| − | These nodes are plugged via an interface AssetTracked node into “Tracked” port of an Objective node. Add additional asset-related conditions for Objective completion. Examples: if an X number of Y items is picked, or if an NPC dies, or if and NPC enters and Area etc. | + | These nodes are plugged via an interface AssetTracked node into “Tracked” port of an Objective node. Add additional asset-related conditions for Objective completion. Examples: if an X number of Y items is picked, or if an NPC dies, or if and NPC enters and Area etc. See the [[Quest_System_Documentation#AssetTracked|asset tracking part of the Quest System documentation]] for more details |
| − | |||
| − | |||
| − | |||
*AssetTracked | *AssetTracked | ||
| Line 103: | Line 109: | ||
*AssetStatistics | *AssetStatistics | ||
| − | + | '''QuestRewards''' | |
| − | |||
| − | |||
These nodes are plugged directly into “Reward” port of an Objective. They give the player the defined reward upon Objective completion. | These nodes are plugged directly into “Reward” port of an Objective. They give the player the defined reward upon Objective completion. | ||
| − | |||
| − | |||
| − | |||
*RewardAchievement | *RewardAchievement | ||
| Line 119: | Line 120: | ||
*RewardReputation | *RewardReputation | ||
*RewardScript | *RewardScript | ||
| − | + | ||
| − | For more details on Node relationships and settings see Quest | + | For more details on Node relationships and settings see [[Quest_System_Documentation|Quest System documentation]]. |
= Edges = | = Edges = | ||
| Line 126: | Line 127: | ||
An edge, visually an arrowed connection, defines the relationships between nodes. Edges can carry signals or define a value for another node port which requires a value. | An edge, visually an arrowed connection, defines the relationships between nodes. Edges can carry signals or define a value for another node port which requires a value. | ||
| − | Example: | + | Example: |
| + | |||
| + | [[File:FlowGraph Documentation Image12.png|thumb|none|800px|A hidden Objective1 is started immediately after the quest is started. Objective1 tracks if soul rat_bernard has at least 5 apples in inventory. When Objective1 is completed, player is immediately rewarded with 1 apple and the visible Objective2 is started.]] | ||
| − | + | An edge can be disabled in context menu when you right-click the dot in its middle. Disabled edges are rendered dashed lines. Disabled edges do nothing. Good for debugging purposes where you want to disable part of the logic without losing the relationship and having to remember it. | |
| − | |||
| − | |||
= Debugging = | = Debugging = | ||
| Line 138: | Line 139: | ||
By pressing this button | By pressing this button | ||
| − | [[File:| | + | [[File:FlowGraph Documentation Image13.png|RTENOTITLE]] |
you turn on/off live visual debugging of FG. If you jump into Game Mode you can see the states of all the nodes, which signal edges have already fired, and in what states the tracking is. | you turn on/off live visual debugging of FG. If you jump into Game Mode you can see the states of all the nodes, which signal edges have already fired, and in what states the tracking is. | ||
| Line 144: | Line 145: | ||
Result may look like this: | Result may look like this: | ||
| − | [[File:| | + | [[File:FlowGraph Documentation Image14.png|1000px|RTENOTITLE]] |
Note: If you think you are not being shown the correct state of the flowgraph, which sometimes happen, click on another one and click back. This will force refresh of the entire FG debug info. | Note: If you think you are not being shown the correct state of the flowgraph, which sometimes happen, click on another one and click back. This will force refresh of the entire FG debug info. | ||
| − | + | ||
| − | + | {{KCDNavigation}} | |
| − | + | ||
| − | |||
| − | |||
[[Category:Documentation]] | [[Category:Documentation]] | ||
Latest revision as of 14:44, 13 February 2020
Contents
Quest Flow Graph
This page documents the Quest Flow Graph extension to the standard CryEngine Flow Graph.
Consult CE documentation if you wish to learn more about standard Flow Graph.
Since Quest Flow Graph operates atop the Quest System, most of the documentation of this tool is in Quest System documentation. This page covers only basic controls and elements of this tool.
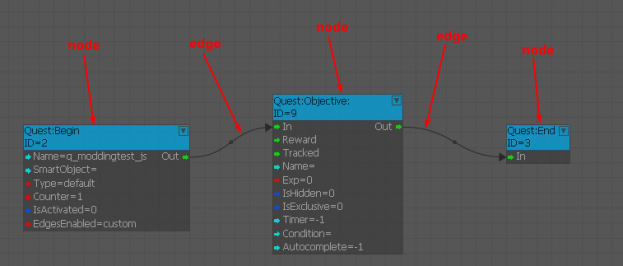
Flow Graphs consist of a set of nodes and edges. Nodes define states and some implicit logic, or provide additional values from other systems (e.g. references to assets from the game level). Edges define relationship between nodes and the rest of the logic.
New Quest Flow Graph
The first step is to create a new quest smart object in Swift. Follow the naming conventions. Copy or remember that name (hereinafter questName).
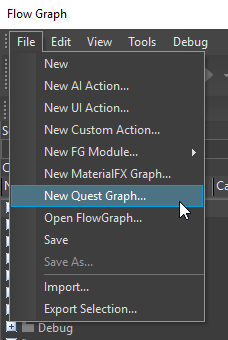
Click this option
You will be prompted to save a XML file. Name it questName.xml.
It should be stored under ..\Data\Libs\quests\flowgraphs
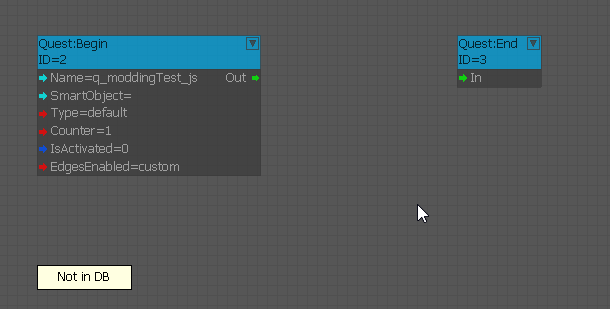
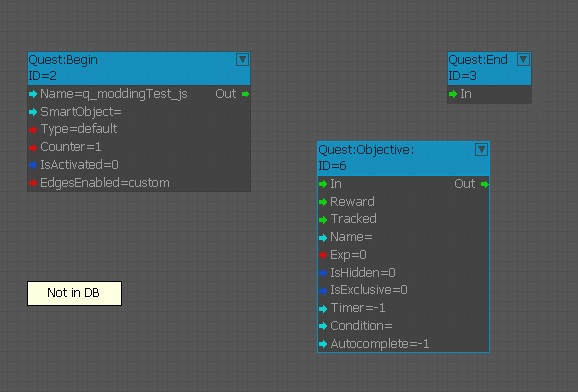
An empty Quest FG will be created
The comment that now states “Not in DB” indicates when was the FG last committed to DB.
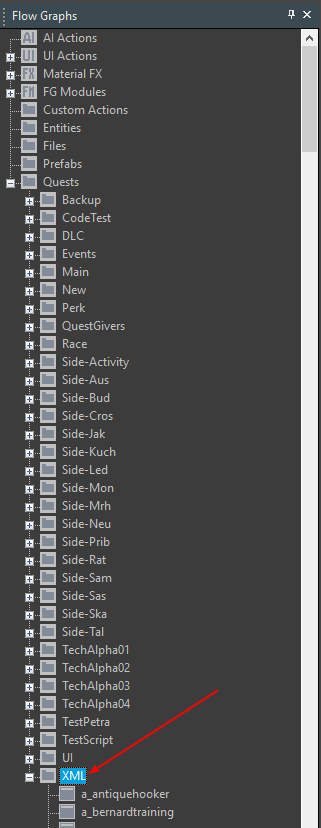
The FG can now be found under XML folder.
Move FG to non-default folder
This folder view is exclusively meant to store XML backups. However your Quest FG must be stored in DB so you should move the newly created reference to another sister folder. You can choose any folder you wish or create a new one. Creating a new folder named after your mod is a good idea.
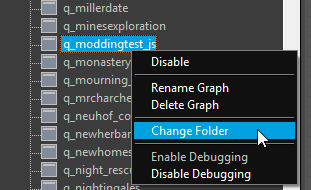
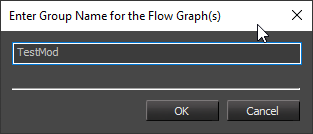
You move the file this way:
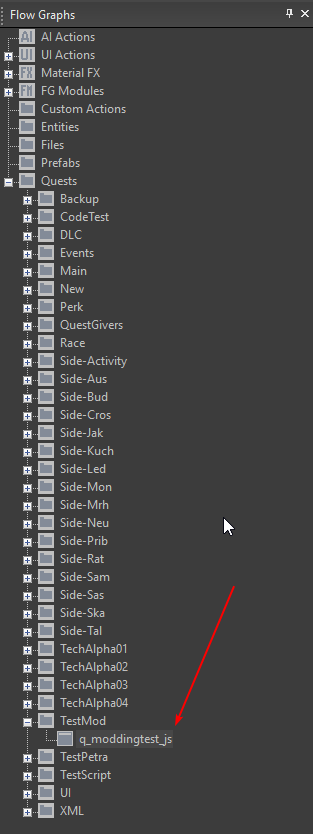
Result:
As a result our new quest is now under new folder but it is still not stored in DB.
Commit quest to DB
A quest needs to contain at least one Objective node to be committable to DB.
Fire up the quicksearch utility by pressing Q anywhere in the Graph space, and type in objective.
Confirm with Enter. A node of the type Objective is inserted.
Now the quest is valid and you can press the “Export Button”.
A confirmation window will pop-up after a while and the comment will signalize the time of last commit and username of the last committer.
Every time you make a change you do it locally. Only after Exporting the quest is the Quest FG stored in DB.
Errors
Should your export to DB fail, you will find error messages in the console.
Common errors:
- Clashing names
- Some orphaned nodes
- Incomplete AssetTracked cascade
- Exclusive properties set at once (e.g. item category vs item type)
- Clashing IDs
Nodes
List of nodes available in the Quest FG
There are 3 quest-state nodes
- Begin – Mandatory. Created automatically. Only one per FG is permitted.
- End - Mandatory. Created automatically. Only one per FG is permitted.
- Objective – Having at least one is mandatory.
All other nodes belong to 2 groups
Asset tracking
These nodes are plugged via an interface AssetTracked node into “Tracked” port of an Objective node. Add additional asset-related conditions for Objective completion. Examples: if an X number of Y items is picked, or if an NPC dies, or if and NPC enters and Area etc. See the asset tracking part of the Quest System documentation for more details
- AssetTracked
- AssetItem
- AssetNPC
- AssetPlace
- AssetStatistics
QuestRewards
These nodes are plugged directly into “Reward” port of an Objective. They give the player the defined reward upon Objective completion.
- RewardAchievement
- RewardExp
- RewardItem
- RewardMoney
- RewardPerk
- RewardReputation
- RewardScript
For more details on Node relationships and settings see Quest System documentation.
Edges
An edge, visually an arrowed connection, defines the relationships between nodes. Edges can carry signals or define a value for another node port which requires a value.
Example:
An edge can be disabled in context menu when you right-click the dot in its middle. Disabled edges are rendered dashed lines. Disabled edges do nothing. Good for debugging purposes where you want to disable part of the logic without losing the relationship and having to remember it.
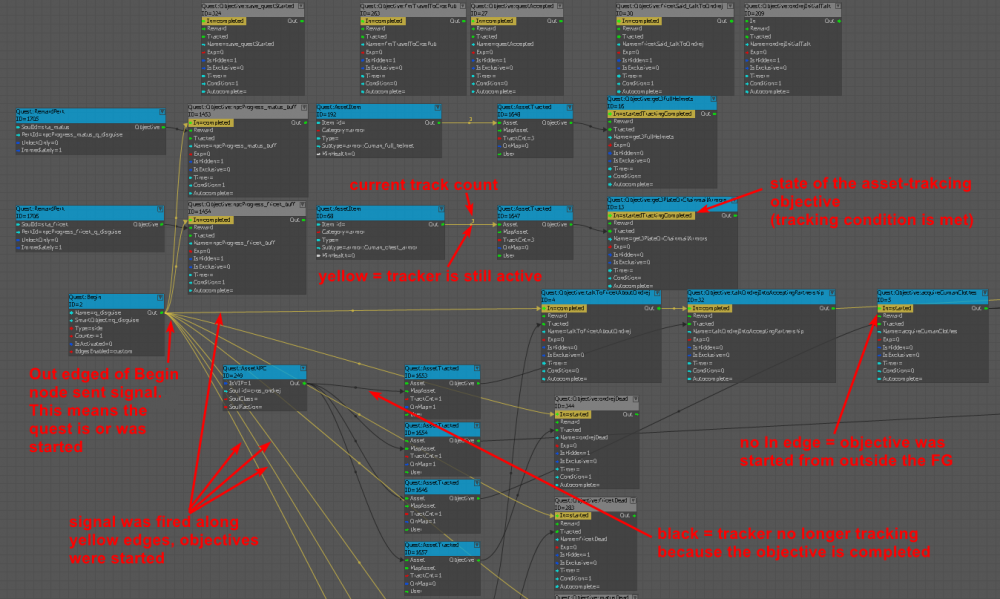
Debugging
By pressing this button
you turn on/off live visual debugging of FG. If you jump into Game Mode you can see the states of all the nodes, which signal edges have already fired, and in what states the tracking is.
Result may look like this:
Note: If you think you are not being shown the correct state of the flowgraph, which sometimes happen, click on another one and click back. This will force refresh of the entire FG debug info.
| Kingdom Come: Deliverance: Forum | Before you start | Tutorials & Instructions | Basic Mods | Tools | Documentation | Glossary | EULA |
