Shader Changes Documentation
We have couple of changes in shaders, this should contain usage guide for this changes.
Contents
Second UVs set for Illum shader
Second UVs set is not essential part of CryEngine, our solutions is hacky as hell, but should work. Second UVs texture helps us to add another level of variation into the model visual.
3ds MAX
UVs coordinates are encoded into vertex color values and later decoded in the shader. Because of this there are two major limitations with the usage:
- All UV vertices in second UVs coordinates must lay in 0..1 UV range
- All open edges in second UVs set need to be sharp edges in the geometry
To export model with second UVs, check Additional UVs: Channel 2 in WH Exporter window:

To use 2nd UVs in editor:
- 2UVs from VC flag is checked in shader generation parameters
- 2nd UVs map goes to [1] Diffuse map slot
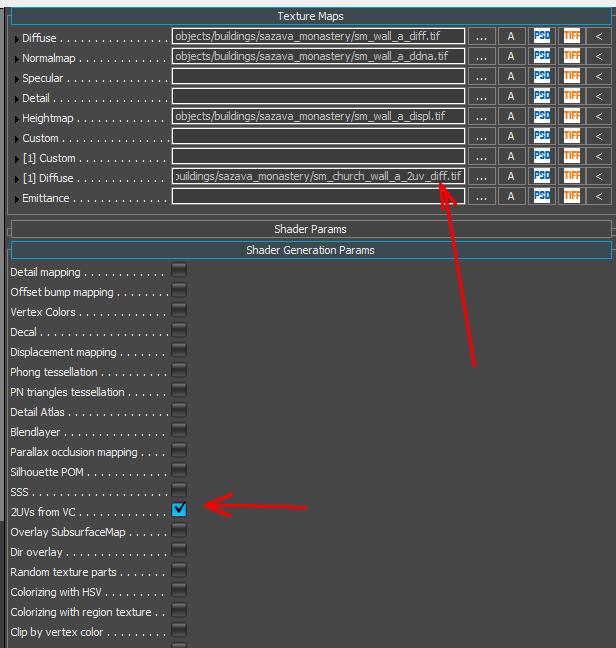

General remarks:
- 2nd UV diffuse map is applied to the model as a equivalent of photoshop's "Overlay" mode; RGB values lighter than 138/138/138 lightens, darker values darkens.
- As addition, if 2nd UVs are enabled together with "Detail mapping", detail mapping uses second UV set for mapping too. Sometimes this is not desired and one can always switch to first UVs by checking Use 1st UVs for DetailMap
Blend layer and second UVs set
Default blend and dirt layer are using vertex alpha information to store blending data. But using our second UVs hack prevents us from using vertex alpha for blend/dirt layer. So in case second UVs are used in the material and there is a need to use blend or dirt layer, vertex alpha information is stored in second UVs map alpha channel, thus information previously held per vertex, is per pixel now. Every other asspect of Blend/Dirt layer remains the same as in standard documentation.
Improved Roads Shader
This has been deprecated for future projects.
The simple texture wrapping on roads can be improved using a shader generation param "Random texture parts"

Once enabled (1), textures are fetched as a vertical atlas, with number of parts set as a shader parameter (2).
Format of all textures should be following:
- All parts are square and of power of two size for correct mip map generation
- All parts are the same size
- At least the top and bottom line of each part is masked by transparency to hide filtering problems

Randomness can be controlled by shader params "Random value offset" and "Random value scale" (3)

Filtering issues visible bellow (basic diffuse mapping and POM) on some edges should be solved in texture using alpha channel:


World mapping
World mapping helps us to seamlessly merge objects with the terrain, as it generates the same mapping as is used on the terrain at the same place. The world mapping is not affected by the position, rotation and scale of the object.
On the picture below, we have an object that adds a detail to the terrain that can't be achieved by the terrain system itself. The top material of the object uses the same diffuse map as the terrain (1). Its TexGenType is set to a new type "World" (2). Please note the old "World" tex gen type has been renamed to "Object" as it behaves exactly like that. The TileU and TileV coeficients are set to the same value as for the terrain grass layer.


