Difference between revisions of "Recolouring an armour for Dragon Age 2"
| Line 82: | Line 82: | ||
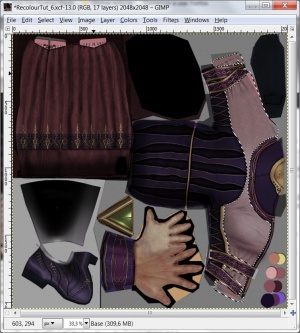
[[File:RecolourTut_7.jpg|right|thumb|Selecting an area to recolour]] | [[File:RecolourTut_7.jpg|right|thumb|Selecting an area to recolour]] | ||
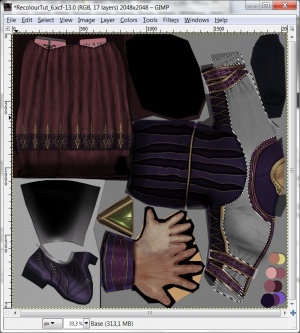
[[File:RecolourTut_8.jpg|right|thumb|Desaturating the selected area]] | [[File:RecolourTut_8.jpg|right|thumb|Desaturating the selected area]] | ||
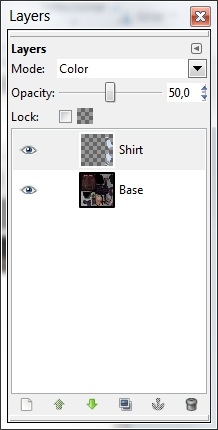
| + | [[File:RecolourTut_9.jpg|right|thumb|Setting blend mode for the new layer]] | ||
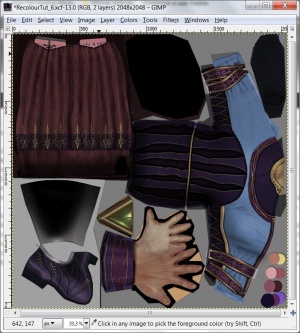
| + | [[File:RecolourTut_10.jpg|right|thumb|Recolour of the selected area]] | ||
At last we know what texture files we want to modify and the real recolouring work can begin. | At last we know what texture files we want to modify and the real recolouring work can begin. | ||
| Line 93: | Line 95: | ||
# Select the area you want to recolour. In picture ''Selecting an area to recolour'' you can see how we have selected the light pink area. | # Select the area you want to recolour. In picture ''Selecting an area to recolour'' you can see how we have selected the light pink area. | ||
# In the layer stack, select the diffuse map you imported and select the menu option ''Colors -> Desaturate''. Select the desaturation option you prefer and click OK. Now the selected area has lost its original colour and is painted in shades of grey as shown in picture ''Desaturating the selected area''. | # In the layer stack, select the diffuse map you imported and select the menu option ''Colors -> Desaturate''. Select the desaturation option you prefer and click OK. Now the selected area has lost its original colour and is painted in shades of grey as shown in picture ''Desaturating the selected area''. | ||
| − | # Add a new transparent layer | + | # Add a new transparent layer on top of the diffuse map: |
| − | + | ## Select the menu option ''Layer -> New Layer'' | |
| − | + | ## Add a name for the new layer, select ''Transparency'' on the pop-up window and click OK | |
| − | + | ##: '''''Note:''' To see and work with the different layers that you have in your image:'' | |
| + | ##:* ''Select the menu option ''Windows -> Dockable Dialogs -> Layers '''' | ||
| + | ##:* ''This will open a window with the layers stack for your image as the one shown in picture ''Layers stack'''' | ||
| + | ##:** ''To work on one of the layers, select the corresponding layer in the stak and then work in GIMP main edition window: all you do (painting, erasing, resizing, etc) will be done on the selected layer.'' | ||
| + | ##:** ''To hide/show one of the layers, click on the eye icon at the left of each of the layers in the layer stack.'' | ||
| + | # Set the foreground colour to the colour you want to use (for this tutorial I've used a light blue, the d1def1 colour). | ||
| + | # Select the Bucket fill tool from the toolbox and fill the selected area on the new transparent layer with the colour you've selected. | ||
| + | # In the layer stack select the layer that contains the colour and change the ''Layer mode'' to ''Color'' and set the ''Opacity'' to ''50'' as shown in picture ''Setting blend mode for the new layer'' (you can try other layer modes and opacities until you find the values that you prefer). | ||
| + | # Now you'll see that the area we've selected previously and that had a light pink colour has changed into a light blue colour as shown in picture ''Recolour of the selected area''. | ||
| + | # Repeat the process of selecting an area, desaturating the diffuse map for that area, adding a new transparent layer, filling the new layer with another colour and setting its blending mode as many times as it is required. I strongly recommend that: | ||
| + | ## you work with different layers for the different parts of the armour you want to recolour. This way you can set the layer blending modes differently for each part of the armour. | ||
| + | ## you don't merge the layers to the base image until the end and save a backup copy containing all the layers. This way you can always change one layer colour, blend mode or opacity easily if when texted in game you don't like the results, without affecting the rest of the work you've done. | ||
Revision as of 17:33, 30 October 2011
Contents
Overview
This tutorial shows how to recolour an armour or outfit for Dragon Age 2.
Required tools
- Mephales' pyGFF tool
- Thought Process' erfpack-rev21.zip
- GIMP
Recolour an armour
Armour file structure in Dragon Age 2
Armours and outfits are defined in several files in Dragon Age 2. The more relevant ones are:
- item_variations.gda: all equippable items in Dragon Age (armours, outfits, weapons, accesories) have an entry in this file. In this entry there are defined the unique code that identifies the item, its name, the path where the mesh and texture files for this item are stored, the type of item, the icons shown for the item, etc.
- mesh files: Meshes in Dragon Age 2 are defined in four different type of files:
- *.mmh: defines the path and name of the other 3 file types of the mesh and has global data of the mesh.
- *.msh: contains the vertex data of the mesh
- *.phy: contains the weight data of the mesh (rigging)
- *.mao: defines the material properties of the mesh and defines the path and name of the texture files.
- texture files: armour meshes use four different texture files:
- *_0d.dds: diffuse map. It defines the colour of the different parts of armour.
- *_0n.dds: normal map. It defines the volume (i.e. the relative heights) of the different parts of the armour.
- *_0s.dds: specular map. It defines how the different part of the armour reflect light and what light colour they reflect.
- *_0t.dds: tint map. It defines what parts of the armour can be tinted and how they react to tints.
Finding out the texture files to modify
This tutorial explains how to recolour an existing armour, so the first step is to find out which are the texture files that are applied to the armour we want to recolour. As Dragon Age 2 doesn't have a toolset, in most cases we have to examine several files until we get the texture files we want to work on. See Extracting files from erf and rim files for Dragon Age 2 for more information on how to extract the game files.
Examine the item_variations.gda file
- Launch the editor.exe of the pyGFF tool.
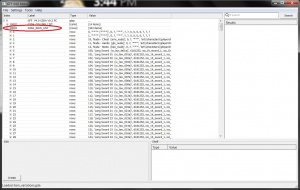
- Select the menu option File -> Open and select the 2da.rim file. A window will pop up like the one shown in picture Selecting a .gda file from the 2da.rim
- Go down until you see the item_variations.gda file, highlight it and press the OK button.
- Now examine the contents of item_variations.gda:
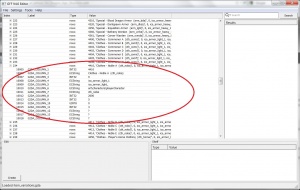
- Expand the G2DA_ROW_LIST by clinking on the + box at the left side and you'll see the row contents as shown in picture item_variations.gda
- Look at the Value column. Each row displays a number (the item code) and then a name (the item name). Browse down until you find the name of the armour you are looking for. In this tutorial we are going to recolour one of the noble outfits, Noble outfit A, so we browse down until we find it in row 234, as shown in picture Noble outfit A.
- Expand the row and look at its contents:
- GDA_COLUMN_6 indicates the path where the mesh and textures files are. In this case it is art\characters\playercharacter
- GDA_COLUMN_7 indicates the name of the mesh files. In this case it is cth_noba
- Take down this information and proceed to the next step.
- Note: It is possible that you don't know the exact name of the armour you want to recolour. For example, let's say that you want to recolour one of the noble outfits but you don't know if it is the Noble outfit A, B, C, D or E. It doesn't matter. By looking at the item_variations.gda you'll see that all noble outfits files are stored under the same folder and are named cth_nob + a letter (cth_noba, cth_nobb, and so on). This information will help you to narrow the search in the next steps.
Examine the *.mmh file
Now that you know the name of the mesh files (or at least, have a short list of possible names), the next step is to examine the mmh file of the armour to find out the name of the corresponding mao file.
- Launch the editor.exe of the pyGFF tool.
- Extract the contents of the artfp.erf file to a temporary folder. (see Extracting files from erf and rim files for Dragon Age 2 for more information on how to extract the game files).
- Select the menu option File -> Open, go to the temporary folder where you've extracted all the mesh and textures files and go down to the folder that was indicated in the item_variations.gda. For the Noble outfit A the folder was art\characters\playercharacter.
- You'll see there several subfolders: children, dwarfmale, elfmale, ... one for each race and gender. In this tutorial we are going to recolour the human female Noble outfit A, so the mesh files we are looking for are in the \humanfemale\ subfolder.
- Inside this subfolder there are lots of files: all the *.mmh, *.msh and *.phy files corresponding to almost all the armours and clothes of the game for human female characters. Look for the mesh files with the name that was indicated in the item_variations.gda file, in our case cth_noba.mmh, cth_noba.msh and cth_noba.phy.
- For recolouring we are only interested in the cth_noba.mmh file. Open it with pyGFF tool and examine its contents.
- Note: In case you didn't know which noble outfit was the one you were looking for, you'll have to examine all the cth_nob files, i.e. cth_noba.mmh, cth_nobb.mmh, cth_nobc.mmh, cth_nobd.mmh and cth_nobe.mmh
- Expand the root node (0)
- Expand the first MMH_CHILDREN node (6999)
- Expand the next root node (0)
- Expand the next MMH_CHILDREN node (6999)
- Expand the last node (6)
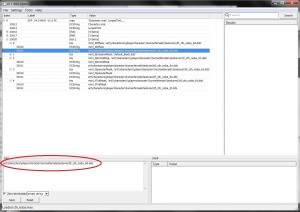
- Look at the value of the MMH_MATERIAL_OBJECT node (600) as shown in picture Noble outfit A *.mmh file. This is the path and name of the *.mao file used by the mesh where the texture files are defined. For the Noble outfit A, the *.mao file is art\characters\playercharacter\humanfemale\cth_noba + .mao.
- Note: In case you didn't know which noble outfit was the one you were looking for, you'll see that the corresponding *.mao files follow the same naming convention, i.e. cth_noba.mao, cth_nobb.mao, cth_nobc.mao, cth_nobd.mao and cth_nobe.mao
Examine the *.mao file
Now let's examine the mao file for the armour.
- Launch the editor.exe of the pyGFF tool.
- Extract the contents of the globalmao-core.rim file to a temporary folder. (see Extracting files from erf and rim files for Dragon Age 2 for more information on how to extract the game files).
- Select the menu option File -> Open, go to the temporary folder where you've extracted all the mao files and go down to the folder that was indicated in the *.mmh file. For the human female Noble outfit A the folder was art\characters\playercharacter\humanfemale and then open the mao file that was indicated there, cth_noba.mao in our case. Open it and examine its contents.
- Expand the root node (0)
- Expand the last node (33020). You'll see that it has 5 different subnodes as shown in picture Noble outfit A *.mao file. Each subnode indicates one of the texture files used by the armour:
- mml_tDiffuse: indicates the diffuse map
- mml_tNormalMap: indicates the normal map
- mml_tSpecularMask: indicates the specular map
- mml_tTintMask: indicates the tint map
- Expand each node and take down the paths and names of the texture files indicated in the mao file, as shown in picture Noble outfit A texture files. For the Noble outfit A the texture files are stored in the folder art\characters\playercharacter\humanfemale\textures\ and the file names are hf_cth_noba_0d.dds for the diffuse map, hf_cth_noba_0n.dds for the normal map, hf_cth_noba_0s.dds for the specular map and hf_cth_noba_0t.dds for the tint map.
- Note: In case you didn't know which noble outfit was the one you were looking for, you'll see that the corresponding texture files indicated in their *.mao files are all stored in the same subfolder and follow the same naming convention, i.e. hf_cth_noba_0d.dds, hf_cth_nobb_0d.dds, hf_cth_nobc_0d.dds, and so on
Modify the texture files
At last we know what texture files we want to modify and the real recolouring work can begin. For a simple recolour we only need to modify the diffuse and specular maps and this is what we are going to do in this tutorial (if you are going to retexture the armour, then you'll have to edit the normal map, too, and probably the tint map).
- Go to the temporary folder were you extracted the contents of the artfp.erf file and search for the texture files indicated in the *.mao file. For the female Noble outfit A go to the art\characters\playercharacter\humanfemale\textures\ subfolder and look for the hf_cth_noba_0d.dds and hf_cth_noba_0s.dds files.
- Note: If you have the high resolution texture patch you may want to use the texture files in that patch. Extract the contents of the highrescharacterartfp.erf into a temporary file and look for the textures there instead of the ones that were in the artfp.erf file.
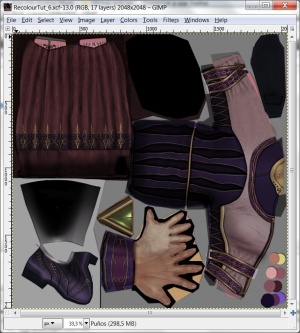
- Open the diffuse map in GIMP as shown in picture Noble outfit A diffuse map.
- Note: If you didn't know which one of the noble outfits was the one you wanted to recolour, open the five diffuse maps in GIMP and look at each of them until you recongnise the one you want to modify.
- Select one of the selection tools from the Toolbox (in most cases the Free Select Tool is the most useful as you will want to select an area that hasn't a geometrical shape).
- Select the area you want to recolour. In picture Selecting an area to recolour you can see how we have selected the light pink area.
- In the layer stack, select the diffuse map you imported and select the menu option Colors -> Desaturate. Select the desaturation option you prefer and click OK. Now the selected area has lost its original colour and is painted in shades of grey as shown in picture Desaturating the selected area.
- Add a new transparent layer on top of the diffuse map:
- Select the menu option Layer -> New Layer
- Add a name for the new layer, select Transparency on the pop-up window and click OK
- Note: To see and work with the different layers that you have in your image:
- Select the menu option Windows -> Dockable Dialogs -> Layers '
- This will open a window with the layers stack for your image as the one shown in picture Layers stack'
- To work on one of the layers, select the corresponding layer in the stak and then work in GIMP main edition window: all you do (painting, erasing, resizing, etc) will be done on the selected layer.
- To hide/show one of the layers, click on the eye icon at the left of each of the layers in the layer stack.
- Note: To see and work with the different layers that you have in your image:
- Set the foreground colour to the colour you want to use (for this tutorial I've used a light blue, the d1def1 colour).
- Select the Bucket fill tool from the toolbox and fill the selected area on the new transparent layer with the colour you've selected.
- In the layer stack select the layer that contains the colour and change the Layer mode to Color and set the Opacity to 50 as shown in picture Setting blend mode for the new layer (you can try other layer modes and opacities until you find the values that you prefer).
- Now you'll see that the area we've selected previously and that had a light pink colour has changed into a light blue colour as shown in picture Recolour of the selected area.
- Repeat the process of selecting an area, desaturating the diffuse map for that area, adding a new transparent layer, filling the new layer with another colour and setting its blending mode as many times as it is required. I strongly recommend that:
- you work with different layers for the different parts of the armour you want to recolour. This way you can set the layer blending modes differently for each part of the armour.
- you don't merge the layers to the base image until the end and save a backup copy containing all the layers. This way you can always change one layer colour, blend mode or opacity easily if when texted in game you don't like the results, without affecting the rest of the work you've done.

