Difference between revisions of "Prefabs and SmartObjects Documentation"
m |
m |
||
| Line 17: | Line 17: | ||
No special directions needed. | No special directions needed. | ||
| + | | ||
== <span>Placing SmartObjects and SmartObjects debug</span> == | == <span>Placing SmartObjects and SmartObjects debug</span> == | ||
| Line 29: | Line 30: | ||
*Make sure 3DDebug panel is visible <div> </div> | *Make sure 3DDebug panel is visible <div> </div> | ||
| − | + | [[File:Ledges Documentation Image6.png|RTENOTITLE]]</div> | |
| − | [[File:Ledges Documentation Image6.png|RTENOTITLE]] </div> | ||
| − | |||
*Hit SmartObjects helpers button. <div> </div> | *Hit SmartObjects helpers button. <div> </div> | ||
| − | + | [[File:Prefrabs Smartobjects Documentation Image1.png|RTENOTITLE]]</div> 4. Select SmartObject in the scene and observe it. Find green/red cubes somewhere (usually on the ground) around the prefab. '''The green ones are accessible (good), the red ones are not (bad)'''. Around each cube there's a bunch of spheres of various colors as well. These are starting points for individual animations that are used to get to the cube. If at least one ball for each actor class (NPC, NPC_female, Player) is on the navmesh, then the cube is green. So your job is to make sure that '''all the cubes are green'''. | |
| − | [[File:Prefrabs Smartobjects Documentation Image1.png|RTENOTITLE]] </div> 4. Select SmartObject in the scene and observe it. Find green/red cubes somewhere (usually on the ground) around the prefab. '''The green ones are accessible (good), the red ones are not (bad)'''. Around each cube there's a bunch of spheres of various colors as well. These are starting points for individual animations that are used to get to the cube. If at least one ball for each actor class (NPC, NPC_female, Player) is on the navmesh, then the cube is green. So your job is to make sure that '''all the cubes are green'''. | ||
| − | |||
For deep dive into the topic see [[Animations_on_Smart_Objects|this.]] | For deep dive into the topic see [[Animations_on_Smart_Objects|this.]] | ||
| Line 107: | Line 104: | ||
=== <span>SmartObjects/Coop/</span> === | === <span>SmartObjects/Coop/</span> === | ||
| − | Coops must be placed as SmartObjects because of functionality – spawning eggs | + | Coops must be placed as SmartObjects because of functionality – spawning eggs :) |
| | ||
[[Category:Documentation]] [[Category:Kingdom Come Deliverance]] | [[Category:Documentation]] [[Category:Kingdom Come Deliverance]] | ||
Latest revision as of 22:42, 28 February 2020
This article is about prefabs and how we use them in Warhorse. Note we have done some inhouse modification of CryENGINE prefabs system.
Prefabs are combinations of different objects that can be placed into the level as a single one. This not only enables us to group objects that are allways together but also tie some functionality with them. In the game itself prefabs don't exists any more, so everything would be possible without them, but they are making the work it much easier for us in the editor.
They are also inheriting their content from the prefab definition, so in case we need to change all of them, we only need to change the definition. On the other hand, if we want some specific change to only one instance, we can do it with local modifications.
Because of the great benefits, you should always use prefab when placing something interactive like chair, bed, cabinet or fireplace.
We can sort prefabs into two general categories:
- SmartObjects - Interactive. Prefabs containing some game logic. These needs to follow some special rules during placement.
- Rest - Static. Just a bunch of brushes and stuff glued together. These can be placed according to general rules.
Contents
Placing prefabs
No special directions needed.
Placing SmartObjects and SmartObjects debug
While placing non-interactive prefabs is no different from placing regular brushes, some special rules have to be followed in case of interactive SmartObjects prefabs.
1. Place a SmartObject (bench for example)
2. Turn on and generate Navmesh around it.
3. Turn on SmartObjectHelpers debug:
- Make sure 3DDebug panel is visible

- Hit SmartObjects helpers button.

For deep dive into the topic see this.
Modifying prefabs
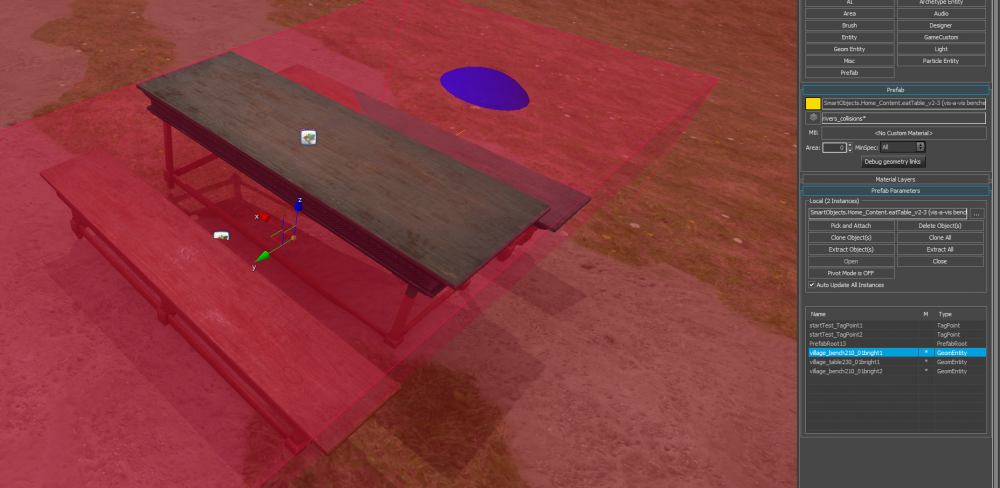
Individual instances of prefabs can be localy modified. The modifications has to retain the functionality, but can change the visual of the prefab. You can for example change shabby villager's table to immaculate castle one. However, you can't touch anything that is used interactively (repostition the bench, for example). Luckily, you shouldn't have to guess. All functionally important objects inside the prefab should be locked (marked by L in center column) by scripters and thus unchangeable. However this is not always the case
To make a local change you should:
- Place the prefab and hit Open button

- You can now select the object you want to change

- Find the geometry property and hit the folder icon

- Find a model you want to replace the original
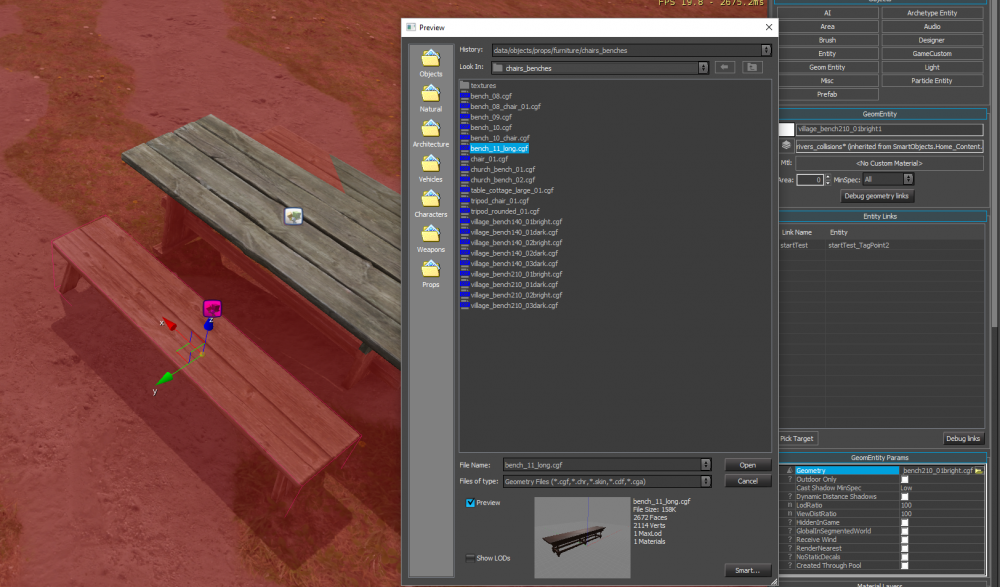
- You did it!
- Now you can change the rest.

- You'll notice little asterisks in the collumn marked as "M". This means the object was localy modified.
- You can right click it and select Revert... to revert the changes.

- Et voila!


More SmartObjecst remarks and how-tos
SmartObjects/Chairs/chair
Chair always need to be placed by the table. Red box must be aligned with table edge. This is because of the animation used (elbows on the table)

SmartObjects/Benches/Bench_1seat
If you want to use chair as standalone sitting object without a table, use Bench_1seat prefab and replace bench model with chair. However there is one limitation regarding the chair model – player/NPC can approach such a chair from both front and back, therefore chair model used MUST NOT have backrest and armrest.
SmartObjects/Alchemy/AlchemyTable
Make sure there is enought light so player is able to read the alchemy book
SmartObjects/Beds
LeftSideAccess, StrictLeftSideAccess – this doesn't matter anymore, use whatever bed you want
- Groundbed – for low beds (cottage, forest)
- Bed – regular beds
- Bed_Castle – fancy castle beds
- Bench – bench bed, could be used for sitting and/or sleeping, usualy for cottage
Do not put bigger items on the bed as they may interfere with laying human.
Notice the small description indicating where the head will rest:

Home prefabs
Every home needs to have this set of prefabs, placed in a meaningful place in close proximity:
- fireplace, kitchen stove – camp fireplace or black kitchen, search prefab for "fireplace" string
- water tube for cleaning – SmartObjects/Home_Content/Water_tube
- bucket – SmartObjects/Home_Content/Water_bucket
- shelve with supplies – SmartObjects/Shelves/Shelve_v2
- bowls for eating – SmartObjects/Shelves/Shelve_with_bowls – 4 bowls in prefab, in case you need more, just place more prefabs
- table for eating – SmartObjects/Home_Content/eatTable – pick the one which fits your space, number of inhabitants etc.
Camp prefabs
Every camp needs to have following prefabs:
- tents – SmartObjects/Camp_Content/tent_a or tent_b – every camper needs its own tent with bed inside
- fireplace – SmartObjects/Camp_Content/Fireplace
- place to sit – SmartObjects/Benches
- bowls for eating – SmartObjects/Shelves/Shelve_with_bowls – 4 bowls in prefab, in case your camp is inhabitat by more people, just place more prefabs
SmartObjects/Coop/
Coops must be placed as SmartObjects because of functionality – spawning eggs :)


