Difference between revisions of "Creating an armour for Skyrim. Part 2"
(→Adjust the armour in Nifskope) |
(→Adjust the armour in Nifskope) |
||
| Line 47: | Line 47: | ||
[[File:SkyrimArmourTut_11.jpg|right|thumb|Deleting unwanted nodes]] | [[File:SkyrimArmourTut_11.jpg|right|thumb|Deleting unwanted nodes]] | ||
[[File:SkyrimArmourTut_12.jpg|right|thumb|Setting the properties of the body data]] | [[File:SkyrimArmourTut_12.jpg|right|thumb|Setting the properties of the body data]] | ||
| + | [[File:SkyrimArmourTut_13.jpg|right|thumb|Adjusting the dismemberment data]] | ||
As the modelling tools are not yet fully adapted to Skyrim, we need to do several adjustments in NifSkope before we can test the armour mesh in game. I am explaining the steps in the order I find it makes things faster and easier (after having done this more than 10 times for only one mesh, I think I've finally found the fastest way! :) ) | As the modelling tools are not yet fully adapted to Skyrim, we need to do several adjustments in NifSkope before we can test the armour mesh in game. I am explaining the steps in the order I find it makes things faster and easier (after having done this more than 10 times for only one mesh, I think I've finally found the fastest way! :) ) | ||
| Line 76: | Line 77: | ||
## The ''Has Normals'' property will have a value of yes. Double click on the yes and change it to no. | ## The ''Has Normals'' property will have a value of yes. Double click on the yes and change it to no. | ||
#: '''''Note''': You only have to edit these properties for the body nodes. They are fine as they are for the armour/clothing nodes.'' | #: '''''Note''': You only have to edit these properties for the body nodes. They are fine as they are for the armour/clothing nodes.'' | ||
| + | # Select the ''BSDismemberSkinInstance'' node of one of the ''NiTriShape'' nodes of your armour as shown in picture ''Adjusting the dismemberment data''. | ||
| + | # In the Block details section expand the ''Partitions'' property. | ||
| + | # Expand the second ''Partitions'' property. | ||
| + | ## Make sure that the ''Part Flag'' property has bloth flags selected: PF_EDITOR_VISIBLE and PF_START_NET_BONESET. If not, double click and select both flags from the drop down list. | ||
| + | ## The ''Body Part'' property will contain one or more of the body parts ypu've created in Blender (BP_TORSO, BP_LEFTLEG or BP_RIGHTARM). Double click on these values and change them to: | ||
| + | ## From BP_TORSO to 32 | ||
| + | ## From BP_RIGHTARM to 34 | ||
| + | ## From BP_LEFTLEG to 37 | ||
| + | # Repeat this steps for all the ''BSDismemberSkinInstance'' nodes of all the ''NiTriShape'' nodes of your armour. | ||
| + | # Save the nif file. | ||
==References== | ==References== | ||
Revision as of 14:18, 14 January 2012
Contents
Overview
This is the part 2 of the tutorial for creating an armour or outfit for Skyrim. You can find the first part of the tutorial here Creating an armour for Skyrim. Part 1
Creating an armour for Skyrim
Create the _0.nif armour mesh
Once you've copied all the weights from the body to your armour and set the dismemberment vertext groups select the body in Object mode and go to Edit mode. In Edit mode select all the faces of the body that are completely hidden by the armour or outfit you are creating. Make sure that all the faces you are selecting are completely inside the armour because if you delete a face that is only partially hidden by the armour you'll see a hole in your character's body when using the armour.
This step is optional but it is worth doing it because:
- you won't have to solve clipping problems because in almost no pose the body will go through the armour
- the size of the mesh will be smaller, increasing performance
- Bethesda does it ;)
Export the armour
Now you are ready to export your armour in nif format, that is the one Skyrim's meshes use.
First thing is to import a new skeleton for your armour:
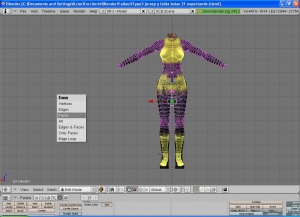
- Make sure that on the Blender screen you see all the objects that form the armour, including the parts of the body that are not hidden by the armour, and that you don't see anything that is not going to form part of your armour (like the light or the camera. If you see those objects move them to another Blender layer and set that layer to invisible or Blender will export those objects toghether with your armour).
- Make sure that you have deleted all the skeletons you imported with the parts of the body, as explained at the beginning of this tutorial.
- In Object mode select one of the objects that form part of your armour and press the A key twice so as to select all objects of the armour.
- Select the menu option File -> Import -> NetImmerse/Gamebyro and select the _0.nif file of the body you imported before for creating the armour (for example the modified femabody_0.nif).
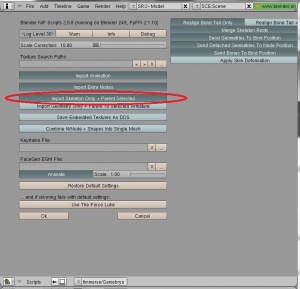
- In the screen that contains the importing parameters select the option Import Skeleton Only + Parent Selected as shown in picture Importing a new skeleton and press the OK button.
Now you have a skeleton in Blender and it is the parent of all the objects that form your armour.
To export the armour:
- In Object mode select the skeleton you've just imported and press A twice to select all parts of the armour and the skeleton.
- Press the Ctrl + A keys and select the option Scale and Rotation to ObData from the pop up menu.
- Keeping the skeleton and all the parts of your armour selected, select the menu option File -> Export -> NetImmerse/Gamebyro, enter the name of the nif file for your armour (for example MyArmour_0.nif) and the folder where you want to save it.
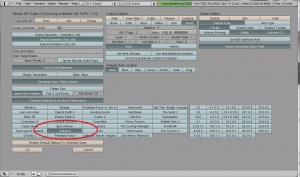
- Set the exporting parameters as shown in the picture Exporting the armour. It is important that the parameters are set like this:
- Fallout 3 -> selected
- Stripify geometries -> deselected
- Smoothen Inter-Object Seams -> selected
- Flatten Skin -> deselected
- Export Skin Partition -> selected
- Press the OK button and wait until Blender finishes saving the nif file.
Adjust the armour in Nifskope
As the modelling tools are not yet fully adapted to Skyrim, we need to do several adjustments in NifSkope before we can test the armour mesh in game. I am explaining the steps in the order I find it makes things faster and easier (after having done this more than 10 times for only one mesh, I think I've finally found the fastest way! :) )
- Load the mesh you've just created into NifSkope (for example MyArmour_0.nif)
- First of all, edit the NiHeader to make it compatible with Skyrim (this is the reverse step of what you did for being able to import Skyrim meshes into Blender):
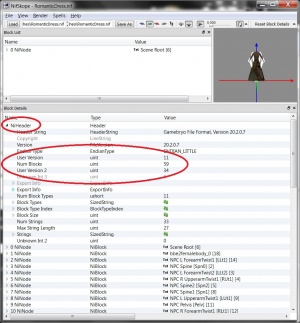
- In the Block detais section, expand the NiHeader property as shown in picture Editting the NiHeader in NifSkope
- You'll see that the User version property has a value of 11. Double click on the 11 and then change it to 12.
- Then go to the User version 2 property, that has a value of 34. Double click on the 34 and then change it to 83.
- Next thing is to get rid of the Scene Root node that Blender has exported with the armour:
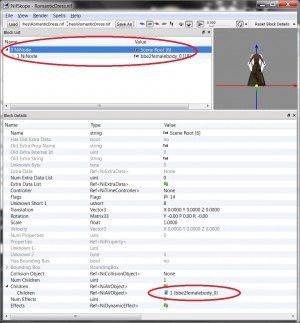
- Expand the Scene Root node as shown in picture Getting rid of the Scene Root node.
- Browse down the Block details section until you see the Children property.
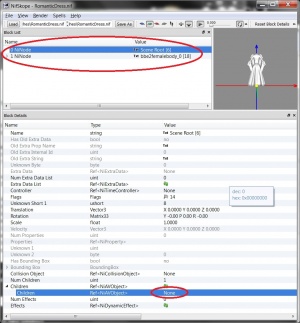
- Expand the Children property. You'll see it contains the node of the armour (in the picture, the 1-bbe2femalebody_0 node). Double clik on the number of this node and delete it, so the Children property points to None.
- Now you'll see something like what is shown in picture Getting rid of the Scene Root node 2: the bbe2femalebody_0 is not under the Scene Root node anymore.
- Select the Scene Root node and press Ctrl + Del or right click and select Block -> Remove Branch.
- Save the nif file.
Now you are ready for the second batch of adjustments:
- Load the nif file again in NifSkope.
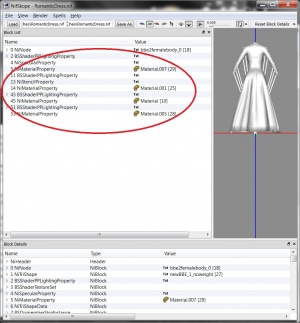
- You'll see that some new nodes appear just below the armour node (bbe2femalebody_0 in the example) as shown in picture Deleting unwanted nodes. These nodes correspond to properties that are not compatible with the nif version used by Skyrim, so you have to delete them.
- Select the first one (BSShaderPPLightingProperty in the picture) and press Ctrl + Del or right click and select Block -> Remove Branch.
- Do the same with all the other nodes (NiSpecularProperty, NiMaterialProperty, etc) until you only see the armour node (bbe2femalebody_0 in the example).
- Save the nif file (this is not strictly required but is a good practive to save often just in case).
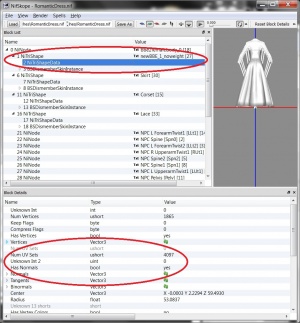
- Expand the root Ninode (bbe2femalebody_0 in the example) as shown in picture Setting the properties of the body data.
- Expand the node that contains the body parts that are shown by the armour (the newBBE_1_noweight in the picture).
- Select the NiTriShapeData node of the body parts.
- Browse down in its Block details until you see the Num UV sets and the Has Normals properties:
- The Num UV sets will have a value of 4097. Double click on the 4097 and change its value to 1.
- The Has Normals property will have a value of yes. Double click on the yes and change it to no.
- Note: You only have to edit these properties for the body nodes. They are fine as they are for the armour/clothing nodes.
- Select the BSDismemberSkinInstance node of one of the NiTriShape nodes of your armour as shown in picture Adjusting the dismemberment data.
- In the Block details section expand the Partitions property.
- Expand the second Partitions property.
- Make sure that the Part Flag property has bloth flags selected: PF_EDITOR_VISIBLE and PF_START_NET_BONESET. If not, double click and select both flags from the drop down list.
- The Body Part property will contain one or more of the body parts ypu've created in Blender (BP_TORSO, BP_LEFTLEG or BP_RIGHTARM). Double click on these values and change them to:
- From BP_TORSO to 32
- From BP_RIGHTARM to 34
- From BP_LEFTLEG to 37
- Repeat this steps for all the BSDismemberSkinInstance nodes of all the NiTriShape nodes of your armour.
- Save the nif file.
