Difference between revisions of "Creating an armour for Fallout 4. Part 4"
m (typo) |
m (→Export Nif: spelling) |
||
| Line 123: | Line 123: | ||
# Enter the name and location of your nif file | # Enter the name and location of your nif file | ||
| − | This will export a Fallout 4 nif file of your armour. Now you can finish adding the materials and checking that everything is OK in NifSkope following what was explained [[Creating_an_armour_for_Fallout_4._Part_2#Adjust_the_armour_in_Nifskope|here]. | + | This will export a Fallout 4 nif file of your armour. Now you can finish adding the materials and checking that everything is OK in NifSkope following what was explained [[Creating_an_armour_for_Fallout_4._Part_2#Adjust_the_armour_in_Nifskope|here]]. |
[[Category:Fallout 4]] | [[Category:Fallout 4]] | ||
Revision as of 15:14, 5 June 2016
Contents
Overview
This is the fourth part of the tutorial on how to create an armour for Fallout 4.
Here I am going to explain some existing alternatives to the process explained in the main tutorial (Creating an armour for Fallout 4. Part 1, Creating an armour for Fallout 4. Part 2 and Creating an armour for Fallout 4. Part 3)
Alternatives
The main process explained previously consisted in the following steps:
- Import process
- Fallout 4 nif file -> 3ds Max -> Fallout 3 nif file -> Blender
- Work in Blender
- Create meshes
- Create UV maps
- Add weights to the meshes
- Export process
- Blender -> Fallout 3 nif file -> 3ds max -> Fallout 4 nif file -> NifSkope -> Fallout 4 nif file (fixed)
Instead of using 3ds max as a bridge between Blender and the game, there are two other alternatives, each one with its pros and cons.
| 3ds max + figment's nif plugin | Outfit Studio | Bethesda Nif Export Plugin | |
|---|---|---|---|
| Pros | * High quality weighting * Most of the work is done in Blender (easy for Blender users) * Imports nif files |
* High quality of geometry (full precision) * Allows building of skin partitions * Imports nif files |
* High quality weighting * Creates almost all extra data (physics) |
| Cons | * Low quality of geometry (medium precision) | * Low quality weighting (you can only copy weights between meshes) | * Requires 3ds max 2013 (not available anymore) * Difficult to use (there is no documentation) * Exported meshes are low quality (medium precision) * Doesn't import nif files (only exports them) |
3ds max + figment's nif plugin
This is the alternative explained in Part 1, Part 2 and Part 3 of this tutorial.
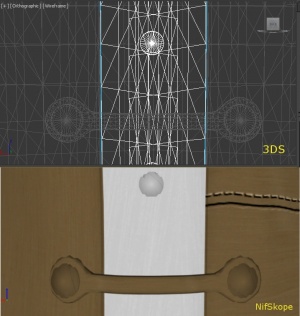
Fallout 4 nif files are, by default, medium precision (probably due to Fallout 4 mods being also available for consoles). That means that detailed meshes get deformed when exported into Fallout 4 nif formats. In picture Medium quality meshes Fallout 4 you can see the mesh in 3ds, with round buttons, and how they get deformed and converted into weird polygons when exported as Fallout 4 nif files. Skyrim meshes didn't had this problem (see picture High quality meshes Skyrim to see how the same mesh keeps the round buttons geometry when exported as an Skyrim nif file).
If you can, it is advisable that you keep the meshes simple and move all the details into normal maps (textures), as Bethesda does. THis way, meshes are exported correctly and you can still see the armour details in game.
If you can't move all the details to the normal maps, then the only alternative available right now is to use Outfit Studio instead of 3ds max as a bridge between Blender and the game.
Outfit Studio
If you are going to use Outfit Studio instead of 3ds max, the process for creating your armour will be:
- Import process
- Fallout 4 nif file -> Outfit Studio -> OBJ file -> Blender
- Work in Blender
- Create meshes
- Create UV maps
- (don't add weights in Blender as you will loose all of them when exporting the mesh as OBJ)
- Export process I
- Blender -> OBJ file -> Outfit Studio
- Work in Outfit Studio
- Add weights to the meshes
- Build skin partition
- Export process II
- Outfit Studio -> Fallout 4 nif file -> NifSkope -> Fallout 4 nif file (fixed, if required)
Export OBJ
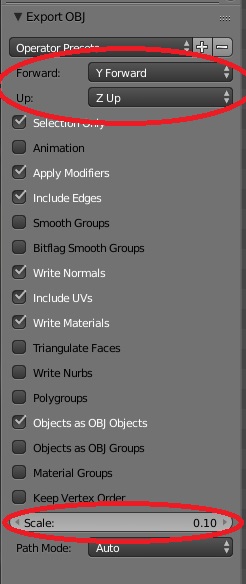
Export your mesh from Blender with the following values (as shown in picture Export OBJ):
- Forward = Y Forward
- Up = Z Up
- Scale = 0.10
Import OBJ into Outfit Studio
- First of all download and install Outfit Studio.
- Launch BodySlide and then launch Outfit Studio (press the Outfit Studio button at the right bottom side of the sceen)
- Select File -> Load Reference
- In the pop up window select the mesh you want to copy the weights from (it is important that the mesh you load here has the weights you want):
- It can be the CBBE body if your mesh has only the weights of the body (an armour with trousers, like the vault suit, for example).
- In this case, leave the default selection (From template -> CBBE Body)
- Press OK
- Another Fallout 4 mesh that has the weights you want to use (a vanilla mesh with a skirt, or a vanilla armour, for example).
- In this case select From file -> then browse to select the nif file of the mesh you are going to use as a reference
- Press OK
- It can be the CBBE body if your mesh has only the weights of the body (an armour with trousers, like the vault suit, for example).
- Wait until Outfit Studio loads the reference mesh
- Select Shape -> Import -> From OBJ ...
- Select the obj file you exported previously from Blender
- Outfit Studio will ask for a name for each of the objects you exported. Enter a unique name for each of them (this name will be the name of each of the nodes in the final nif file)
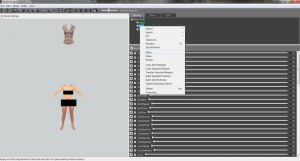
- The imported OBJ will be floating above the reference mesh (as shown in picture Outfit Studio). To align it with the reference mesh:
- Right click on each of the imported objects and, from the pop-up menu, select Move
- Then enter the following values:
- X = 0.0002
- Y = 0.8818
- Z = -120.8440
- Repeat for each of the imported objects, until all of them are aligned with the reference mesh.
Add weights in Outfit Studio
The process of adding weights here only supports copying weights from the reference mesh to your armour mesh. There is no posibility of painting weights or of selecting parts of the mesh and copying weights only there. If your mesh requires this kind of weight painting then you should use any of the other two alternatives available for exporting meshes.
- Right click on each of the imported objects and, from the pop-up menu, select Copy Bone Weights
- Wait until Outfit Studio finishes copying weights from the reference mesh to your mesh
- Right click on each of the imported objects and, from the pop-up menu, select Build Skin Partitions
- This will create the skin partitions for your mesh (you won't have to do that in NifSkope)
- Repeat these steps for each of the objects that form your armour.
Full Precision meshes (Optional)
If you want your mesh to have a high quality geometry when exported into the Fallout 4 nif format:
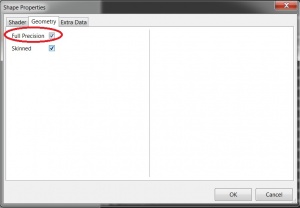
- Right click on each of the imported objects and, from the pop-up menu, select Properties
- Go to the Geometry tab
- Check the Full Precision box (as shown in picture Full Precision mesh)
- Repeat for each of the objects that form your armour
Export Nif
Export your armour from Outfit Studio:
- Select the objects that form your armour
- Select File -> Export -> Export NIF
- Enter the name and location of your nif file
This will export a Fallout 4 nif file of your armour. Now you can finish adding the materials and checking that everything is OK in NifSkope following what was explained here.


