Difference between revisions of "Creating an armour for Fallout 4. Part 3"
(Created page with "==Overview== This is the part 3 of the tutorial for creating an armour or outfit for Fallout 4. You can find the other parts of the tutorial here: * [[Creating_an_armour_for_Fall...") |
m (Added reference to BC5 format) |
||
| Line 8: | Line 8: | ||
[[File:Sword_7_Normal_map.jpg|right|thumb|Normal map window]] | [[File:Sword_7_Normal_map.jpg|right|thumb|Normal map window]] | ||
| + | [[File:TutFO4_26_BC5_format.jpg|right|thumb|Saving the dds file - BC5 format]] | ||
Next step is to paint the textures: to do this you can use a program like [http://www.gimp.org.es/ GIMP]. You can immport the UV map image file you saved earlier into GIMP and use it as a pattern to paint the textures: this way you will know at any time what part of the sword you are painting. | Next step is to paint the textures: to do this you can use a program like [http://www.gimp.org.es/ GIMP]. You can immport the UV map image file you saved earlier into GIMP and use it as a pattern to paint the textures: this way you will know at any time what part of the sword you are painting. | ||
| − | Once you've painted the armour textures save them as dds as this is the image format that the game requires. If the images don't have transparent parts you can save them with DTX1 compression. If they have transparency | + | Once you've painted the armour textures save them as dds as this is the image format that the game requires. If the images don't have transparent parts you can save them with DTX1 compression. If they have transparency save them as DTX3 or DTX5. Make sure that the ''Generate mipmaps'' flag is marked when you save the textures. |
Once you've painted the textures you'll have to create the normal maps that are the image files that will give your sword a sense of volume. You can create the normal map from the texture you've just painted, to do it this way just follow these steps: | Once you've painted the textures you'll have to create the normal maps that are the image files that will give your sword a sense of volume. You can create the normal map from the texture you've just painted, to do it this way just follow these steps: | ||
| Line 20: | Line 21: | ||
## select a filter (I usually select 3x3 but you can try different filters and see which one works better for you) | ## select a filter (I usually select 3x3 but you can try different filters and see which one works better for you) | ||
## modify the scale value to add more or less deep to the normal map (I usually set this to 3 or 4) | ## modify the scale value to add more or less deep to the normal map (I usually set this to 3 or 4) | ||
| − | ## Press the OK button and the image will show now a blueish look: this is the normal map. Save it with the same name than your texture file + the _msn.dds extension and choose the | + | ## Press the OK button and the image will show now a blueish look: this is the normal map. Save it with the same name than your texture file + the _msn.dds extension and choose the BC5 compression as shown in picture ''Saving the dds file - BC5 format''. Make sure that the ''Generate mipmaps'' flag is selected when saving it. |
:'''''Note:''' If your textures look too shiny in game and you want to make your textures less shiny:'' | :'''''Note:''' If your textures look too shiny in game and you want to make your textures less shiny:'' | ||
Revision as of 18:47, 30 March 2016
Overview
This is the part 3 of the tutorial for creating an armour or outfit for Fallout 4. You can find the other parts of the tutorial here:
Create the textures and the normal maps in GIMP
This step is exactly the same than the one explained in the tutorial Creating a sword for Fallout because it doesn't matter the mesh you are working with: you will create the textures and normal maps following the same steps.
Next step is to paint the textures: to do this you can use a program like GIMP. You can immport the UV map image file you saved earlier into GIMP and use it as a pattern to paint the textures: this way you will know at any time what part of the sword you are painting.
Once you've painted the armour textures save them as dds as this is the image format that the game requires. If the images don't have transparent parts you can save them with DTX1 compression. If they have transparency save them as DTX3 or DTX5. Make sure that the Generate mipmaps flag is marked when you save the textures.
Once you've painted the textures you'll have to create the normal maps that are the image files that will give your sword a sense of volume. You can create the normal map from the texture you've just painted, to do it this way just follow these steps:
- Select Colors -> Color to alpha and then select black or 000000 as the source colour.
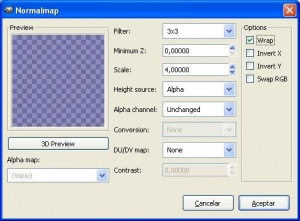
- Select Filter -> Map -> Normalmap. A window will pop up like the one shown in the Normal map window picture.
- pressing 3d preview you will be able to see in another screen how the changes in the parameters give more or less deep to the normal map.
- select the Wrap flag and change the value of Height source to Alpha.
- select a filter (I usually select 3x3 but you can try different filters and see which one works better for you)
- modify the scale value to add more or less deep to the normal map (I usually set this to 3 or 4)
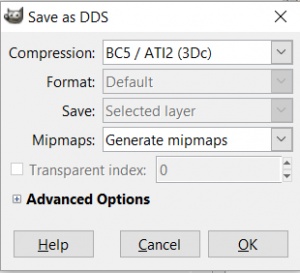
- Press the OK button and the image will show now a blueish look: this is the normal map. Save it with the same name than your texture file + the _msn.dds extension and choose the BC5 compression as shown in picture Saving the dds file - BC5 format. Make sure that the Generate mipmaps flag is selected when saving it.
- Note: If your textures look too shiny in game and you want to make your textures less shiny:
- make your textures a little darker: for example, don't paint white parts in white but in a light grey.
- make the normal map a little more transparent: if you are generating them from the textures, you can try the following:
- before generating the normal map, add a black layer to the texture and merge it with the texture using a % of opacity (like 50%, or 25%).
- merge down the black layer onto your original texture and then generate the normal map.


