Difference between revisions of "Adding physics to an armour in Fallout 4"
m |
Pickysaurus (talk | contribs) m |
||
| (5 intermediate revisions by one other user not shown) | |||
| Line 7: | Line 7: | ||
[[File:Tut_Physics_1_Cloth_bones.jpg|right|thumb|Clothing bones]] | [[File:Tut_Physics_1_Cloth_bones.jpg|right|thumb|Clothing bones]] | ||
[[File:Tut_Physics_2_BSClothExtraData.jpg|right|thumb|BSClothExtraData node]] | [[File:Tut_Physics_2_BSClothExtraData.jpg|right|thumb|BSClothExtraData node]] | ||
| + | [[File:Tut_Physics_3_Irma_skirt.jpg|right|thumb|Irma skirt]] | ||
| + | [[File:Tut_Physics_4_Cloth_bones_weights.jpg|right|thumb|Mesh rigged to the Cloth bones]] | ||
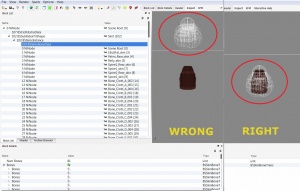
| + | [[File:Tut_Physics_5_OutfitStudio.jpg|right|thumb|Outfit Studio wrong possitions of the Cloth bones]] | ||
| + | |||
* [http://www.blender.org/ Blender]: Main tool used for creating the meshes, assigning weights and creating the UV maps. | * [http://www.blender.org/ Blender]: Main tool used for creating the meshes, assigning weights and creating the UV maps. | ||
** '''Blender 2.49''': | ** '''Blender 2.49''': | ||
| Line 24: | Line 28: | ||
== Adding physics to an armour in Fallout 4 == | == Adding physics to an armour in Fallout 4 == | ||
| − | |||
Fallout 4 doesn't really incorporate physics with collision to clothes. Fallout 4 physics are managed by two things: | Fallout 4 doesn't really incorporate physics with collision to clothes. Fallout 4 physics are managed by two things: | ||
* weighting the armours to lots of so called ''Bone_Cloth'' bones (or Bone_Coat or Bone_Hair) as shown in picture ''Clothing bones'' | * weighting the armours to lots of so called ''Bone_Cloth'' bones (or Bone_Coat or Bone_Hair) as shown in picture ''Clothing bones'' | ||
| Line 31: | Line 34: | ||
Probably, the [[http://wiki.nexusmods.com/index.php/Creating_an_armour_for_Fallout_4._Part_4#Bethesda_Nif_Export_Plugin|Bethesda Nif Export Plugin]] is able of generating those two items, but it requires 3DS max 2013 and it is not available anymore, so I am going to explain how to get the same result using Blender. | Probably, the [[http://wiki.nexusmods.com/index.php/Creating_an_armour_for_Fallout_4._Part_4#Bethesda_Nif_Export_Plugin|Bethesda Nif Export Plugin]] is able of generating those two items, but it requires 3DS max 2013 and it is not available anymore, so I am going to explain how to get the same result using Blender. | ||
| − | === Weighting the mesh to the cloth bones === | + | === Weighting the armour to the cloth bones === |
| + | The weighting of the mesh is done as you would weight a nomral mesh, but instead of weighting it to "normal" bones, you weight it to the "Cloth bones". | ||
| + | The easiest way of doing it is by copying the weights from a vanilla mesh with physics to your mesh. | ||
| + | |||
| + | # Import into Blender a vanilla mesh with the physics you want to copy to your own mesh. In my case, as I was adding physics to a skirt, I used the Irma outfit. | ||
| + | # (Optional) Delete any part of the vanilla mesh that contains weights that you don't want to copy. This makes it easier to copy exactly the weights you want to copy and you won't have to delete later lots of vertex groups that have zero weight in your mesh to avoid the [[Fixing_Invisible_Meshes_for_Fallout_4|Invisible mesh bug]]. For this tutorial I kept only the skirt of the Irma outfit as shown in picture "Irma skirt". | ||
| + | # Then copy the weights from the vanilla mesh you are using (the Irma skirt in my case) to your own armour following the steps explained here: [[Creating_an_armour_for_Fallout_4._Part_1#Completely_copy_all_the_weights_from_another_mesh|Completely copy all the weights from another mesh]] | ||
| + | # After that, check all the vertex groups created in your armour and delete the ones with zero weight. Now your armour should be rigged to the Cloth bones as shown in picture ''Mesh rigged to the Cloth bones'' | ||
| + | |||
| + | === Export the armour === | ||
| + | Export the armour nif file as with any other nif file, following the steps explained here: [[Creating_an_armour_for_Fallout_4._Part_2#Export_the_armour|Export the armour]]. | ||
| + | |||
| + | : It is '''important''' here that the skeleton you use for exporting the armour is a skeleton that has all the cloth bones that your armour needs, so my recommendation is that you use the skeleton of the vanila mesh you've used for copying the weights. In my case, I've used the skeleton of the Irma outfit, as it is the one I've used to copy the weights from. | ||
| + | |||
| + | === Adjust the armour in NifSkope === | ||
| + | Adjust the armour nif file in NifSkope as with any other nif file, following the steps explained here: [[Creating_an_armour_for_Fallout_4._Part_2#Adjust_the_armour_in_Nifskope|Adjust the armour in NifSkope]] | ||
| + | |||
| + | : It is '''important''' here that the vanilla nif file you are using here has the same skeleton you use for exporting the armour and the BSClothExtraData that matches that skeleton, so my recommendation, again, is that you use nif file of the vanila mesh you've used for copying the weights. In my case, I've used the nif file of the Irma outfit, as it is the one I've used to copy the weights from. | ||
| + | |||
| + | And this is it, now your armour has physics in Fallout 4 :) | ||
| + | |||
| + | == Outfit Studio and Cloth Physics == | ||
| + | Right now, Outfit Studio destroys physics applied to outfits. Even if you try only to make an existing mesh with physics compatible with BodySlide, it will detroy the physics of the mesh. | ||
| + | |||
| + | The problem is that, Outfit Studio sends the Cloth bones to the possitive Z values, so they are not on the mesh, as you can see in picture ''Outfit Studio wrong possitions of the Cloth bones''. Those spheres indicate the position and sphere of action of each bone. The mesh of the left is one that has been exported from Outfit Studio and you can see that all bones are not placed on the skirt. The mesh on the right is a working mesh with physics, with all the bones in the right place. | ||
| + | |||
| + | To fix that you need to reweight the mesh using Blender (or another 3D tool) following the steps explained above. | ||
== Related pages == | == Related pages == | ||
| Line 42: | Line 71: | ||
[[Category:GIMP]] | [[Category:GIMP]] | ||
[[Category:NifSkope]] | [[Category:NifSkope]] | ||
| + | [[Category: Mod Creation]] | ||
Latest revision as of 15:24, 15 November 2018
Contents
Overview
This tutorial shows all the main steps you need to follow to add physics to an armour, outfit or hair in Fallout 4. In this tutorial I am assuming that you have already createda working armour for Fallout 4, this tutorial only deals with adding physics to the existing armour. If you want to create an armour from scratch, follow this tutorial: Creating an armour for Fallout 4. Part 1
Currently the tools used for modelling are not completely adapted for Fallout 4, there are some steps that require some manual adjustments.
Required tools
- Blender: Main tool used for creating the meshes, assigning weights and creating the UV maps.
- Blender 2.49:
- You can use the old and stable Blender version 2.49, and follow the instructions given here: Installation of Blender to install everything you need.
- Blender 2.7x:
- Important: If you want to use a newer version of Blender, don't use version 2.76b, as the copy weights between meshes doesn't work properly. Install version 2.75 instead. Then you should install the Blender Nif Plugin 2.6.0a0.dev4. Take into account that this is not a official release but that it is still under development.
- The process for installing the Nif Plugin in Blender 2.7x has changed from the one used to install plugins in version 2.49. To install it follow these steps:
- Download the compressed file containing the nif plugin anywhere you want (remember where it is, though). Don't unzip it.
- In Blender, select the menu option File -> User preferences. A window like the one shown in the picture Blender User Preferences will pop up.
- Select the Import-Export category from the list on the left side of the screen, and then click on the button Install from file ...
- In the new window, navigate to the folder where you've sotred the zip file with the nif plugin you've just downloaded and select it. Then click the button Install from file ... in that window.
- Once Blender has finished reading the nif plugin files, it will take you back to the User preferences window. There, look for the Nif plugin you've just installed (the text on screen should be like the one shown on picture Activate Nif Plugin) and check on the checkbox at the right to activate it.
- Then press the button Save User Settings and then close the User preferences window.
- Blender 2.49:
- Nifskope: Used for fine tunning the meshes for using them inside the game.
- NifSkope 2.0 Pre-Alpha 4 is the first version of NifSkope that supports the FO4 format. Take into account that it is not a official release but that it is stilll under development.
- 3ds Max: Only as a bridge between the game and Blender for importing and exporting meshes to the FO4 format. If you are a student you can get your free version of Max directly from the homepage. And 3ds Max Nif plugin: that supports the Fallout 4 nif format.
Adding physics to an armour in Fallout 4
Fallout 4 doesn't really incorporate physics with collision to clothes. Fallout 4 physics are managed by two things:
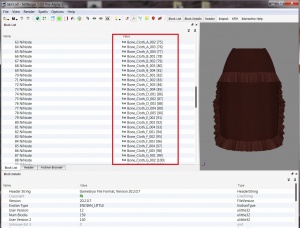
- weighting the armours to lots of so called Bone_Cloth bones (or Bone_Coat or Bone_Hair) as shown in picture Clothing bones
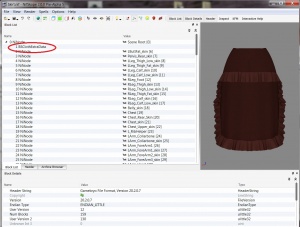
- by adding a BSClothExtraData to the nif file as shown in picture BSClothExtraData node
Probably, the [Nif Export Plugin] is able of generating those two items, but it requires 3DS max 2013 and it is not available anymore, so I am going to explain how to get the same result using Blender.
Weighting the armour to the cloth bones
The weighting of the mesh is done as you would weight a nomral mesh, but instead of weighting it to "normal" bones, you weight it to the "Cloth bones". The easiest way of doing it is by copying the weights from a vanilla mesh with physics to your mesh.
- Import into Blender a vanilla mesh with the physics you want to copy to your own mesh. In my case, as I was adding physics to a skirt, I used the Irma outfit.
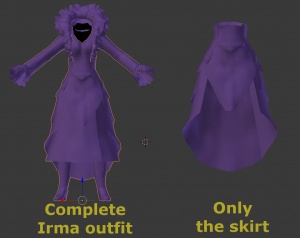
- (Optional) Delete any part of the vanilla mesh that contains weights that you don't want to copy. This makes it easier to copy exactly the weights you want to copy and you won't have to delete later lots of vertex groups that have zero weight in your mesh to avoid the Invisible mesh bug. For this tutorial I kept only the skirt of the Irma outfit as shown in picture "Irma skirt".
- Then copy the weights from the vanilla mesh you are using (the Irma skirt in my case) to your own armour following the steps explained here: Completely copy all the weights from another mesh
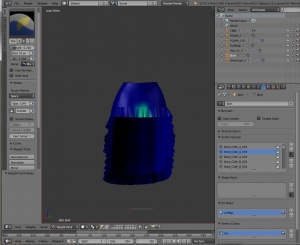
- After that, check all the vertex groups created in your armour and delete the ones with zero weight. Now your armour should be rigged to the Cloth bones as shown in picture Mesh rigged to the Cloth bones
Export the armour
Export the armour nif file as with any other nif file, following the steps explained here: Export the armour.
- It is important here that the skeleton you use for exporting the armour is a skeleton that has all the cloth bones that your armour needs, so my recommendation is that you use the skeleton of the vanila mesh you've used for copying the weights. In my case, I've used the skeleton of the Irma outfit, as it is the one I've used to copy the weights from.
Adjust the armour in NifSkope
Adjust the armour nif file in NifSkope as with any other nif file, following the steps explained here: Adjust the armour in NifSkope
- It is important here that the vanilla nif file you are using here has the same skeleton you use for exporting the armour and the BSClothExtraData that matches that skeleton, so my recommendation, again, is that you use nif file of the vanila mesh you've used for copying the weights. In my case, I've used the nif file of the Irma outfit, as it is the one I've used to copy the weights from.
And this is it, now your armour has physics in Fallout 4 :)
Outfit Studio and Cloth Physics
Right now, Outfit Studio destroys physics applied to outfits. Even if you try only to make an existing mesh with physics compatible with BodySlide, it will detroy the physics of the mesh.
The problem is that, Outfit Studio sends the Cloth bones to the possitive Z values, so they are not on the mesh, as you can see in picture Outfit Studio wrong possitions of the Cloth bones. Those spheres indicate the position and sphere of action of each bone. The mesh of the left is one that has been exported from Outfit Studio and you can see that all bones are not placed on the skirt. The mesh on the right is a working mesh with physics, with all the bones in the right place.
To fix that you need to reweight the mesh using Blender (or another 3D tool) following the steps explained above.
