Difference between revisions of "Creating cubemaps for Skyrim"
m |
|||
| Line 36: | Line 36: | ||
In this tutorial I've chosen a picture of the Milky Way but it could be any other picture. Open the picture as a new layer ''(File -> Open as layers ...)'' and position/resize/rotate it until you get something like the ''Initial picture''. | In this tutorial I've chosen a picture of the Milky Way but it could be any other picture. Open the picture as a new layer ''(File -> Open as layers ...)'' and position/resize/rotate it until you get something like the ''Initial picture''. | ||
| + | |||
| + | == Make the picture seamless == | ||
| + | [[File:TutCubemap5.jpg|right|thumb|Seams]] | ||
| + | As previously said, the cubemap id formed by six images that correspond to the six faces of a cube. For it to reflect the light correctly, the cubemap has to be seamless, i.e. the edges where two faces will be joined when folding the cubemap on a cube should show a continuous picture. | ||
| + | Depending on the picture you've chosen and where you've decided to set the limits of the cube map this task can be very difficult and tedious, so take this in mind when chosing the base image and deciding which portion of it you want to use for the cubemap. | ||
| + | |||
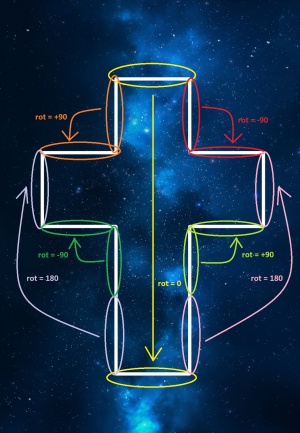
| + | In picture ''Seams'' it is shown what edges will be joined together when folded on to the cube and the rotations (expressed in degrees) each of the edges will undergo when joining the corresponding edge of the other face. | ||
| + | |||
==References== | ==References== | ||
Revision as of 14:22, 8 August 2014
Contents
Overview
This tutorial shows all the main steps you need to follow to create a cubemap for Skyrim (the cubemap you create here may be used in other games, too).
Required tools
Cubemaps
Cubemaps are the texture files that are used on metallic items (like weapons and armours) to add reflections to them. In Skyrim they are usually named with the _e.dds extension.
The strength of the reflection in game is modulated by:
- the shader flags sets in the nif file, under the BSLightingShaderProperty node. This settings will affect all the mesh node.
- the environment mask. This texture file is used to adjust the reflection in the different parts of the mesh (envirnment mask files are usually named with the _em.dds extension): the white parts of the environment mask will show all the reflections set in the cubemap, the black parts will have no reflection at all and the grey parts will be somewhere in between depending on the shade of grey used.
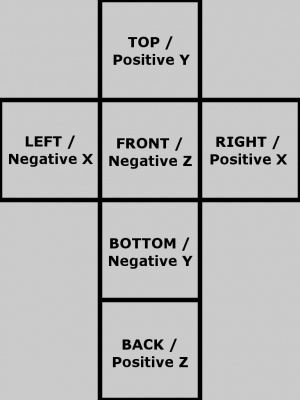
The name cubemap comes from the fact that these textures have the shape of an unfolded cube: they consist of six square images of the same size that will cover the six faces of a cube with a seamless picture. There are several shapes for cubemaps (as there are several ways in which you can unfold a cube), the one I am going to use in ths tutorial is the vertical cross shape as shown in picture Vertical cross cubemap.
The most common way of creating a cubemap is using a picture of a landscape, as this landscape will be the image reflected on the item, but you can create cubemaps also using just abstract images with dark and light spots.
Prepare the picture
Begin with a blank image in GIMP, the size of it to be a little bigger than the cubemap you are going to use. In this tutorial I am going to work with faces of 256 x 256 and the vertical cross shape, so the total size of my cubemap will be:
- width = 3 * 256 = 768
- height = 4 * 256 = 1024
And the canvas I am using is 1042 x 1503 but any size will do as long as it is bigger than 768 x 1024.
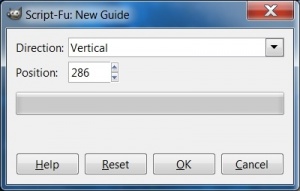
A very useful thing to do is to set a grid in GIMP using guides. These guides will mark the edges of each of the six faces that form the cubemap. To make sure that the spacing between them is exactly the size you've chosen for your square faces (256 in this tutorial), select the menu Image -> Guides -> New Guide ... and then select if the new guide is horizontal or vertical and its position in pixels as shown in picture Adding a vertical guide.
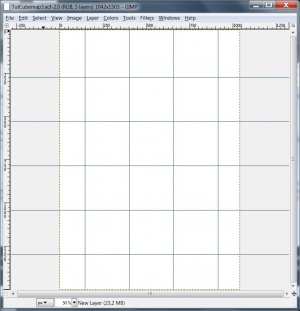
After you've added all the required guides, you'll end up with something similar to the image shown in picture Grid.
The next step is to select the base image that will be used for the cubemap, or draw it yourself.
- Note: If you decide to draw the picture yourself to make things easier, make sure that all the edges have the same colour and paint the light spots without modifying the edges. That will save you a lot of time.
In this tutorial I've chosen a picture of the Milky Way but it could be any other picture. Open the picture as a new layer (File -> Open as layers ...) and position/resize/rotate it until you get something like the Initial picture.
Make the picture seamless
As previously said, the cubemap id formed by six images that correspond to the six faces of a cube. For it to reflect the light correctly, the cubemap has to be seamless, i.e. the edges where two faces will be joined when folding the cubemap on a cube should show a continuous picture. Depending on the picture you've chosen and where you've decided to set the limits of the cube map this task can be very difficult and tedious, so take this in mind when chosing the base image and deciding which portion of it you want to use for the cubemap.
In picture Seams it is shown what edges will be joined together when folded on to the cube and the rotations (expressed in degrees) each of the edges will undergo when joining the corresponding edge of the other face.
